 Laser MTS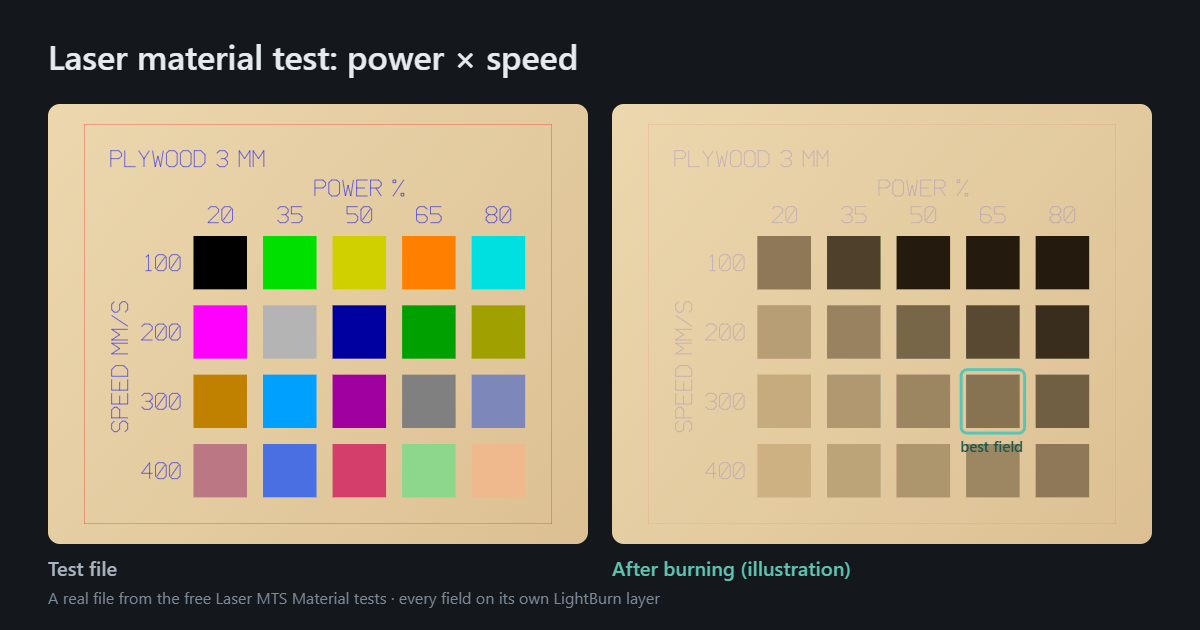
In short
- Settings from tables never transfer 1:1 — every sheet, laser and lens behaves a bit differently. A test on a scrap of material takes a few minutes and saves whole sheets.
- A power × speed grid shows on a single tile which combination gives an even engraving or a clean cut.
- Kerf (the width the laser burns away) is measured with a strip of pieces or a comb of slots. It decides whether finger joints fit snugly.
- The free Laser MTS Material tests generate all four tests as a ready LightBurn file — power and speed already set on every layer.
Why the same settings don't work on every sheet
1/8-inch (3 mm) plywood from two suppliers can cut completely differently. The glue between plies (the hardest part to burn through), the wood species, moisture and hidden knots all vary. Then there is the laser: a tube or diode loses power with age, the lens gets dirty and the focus can be a millimeter too high.
That is why settings tables from the internet are a good starting point, not the answer. The answer is a test on this particular material, on this particular laser — and saving the result so you never have to run it again.
The power × speed test
This is the most important test. A grid of fields is burned on a tile: power increases across the columns, speed down the rows. Each field gets a different pair of settings, so a single run shows you the whole range at once.
- For engraving, pick the field with an even, pleasant color — no deep burn and no scorched edges. The fastest good field means shorter job times.
- For cutting, switch to cut lines and look for the fastest field that cuts all the way through. On thicker sheets also try two passes at a higher speed — they often give a cleaner edge than one slow pass.
A rule that helps read the result: the energy delivered to each millimeter depends on the ratio of power to speed. A field at 40% power and 200 mm/s gets roughly as much energy as 20% at 100 mm/s — which is why the dark fields line up diagonally across the grid.
In Material tests every field goes on its own LightBurn layer with power and speed already set, and the labels (power, speed, material name) are engraved as a thin single line on a separate layer. Open the .lbrn2 file and run it — no typing in 20 combinations by hand. LightBurn has a 30-layer limit, so a grid can have up to 27 fields.
Measuring kerf
Kerf is the width of material the laser burns away when cutting — usually 0.1 to 0.3 mm (0.004–0.012 in). For decorations it does not matter, but for finger-joint boxes, puzzles or slots it decides whether parts fit snugly or rattle. For the cutting basics, see Laser cutter guide — how it works and where to start.
The test is simple: the laser cuts a strip with a few pieces inside. After cutting, push the pieces to one side and measure the gap left with calipers. Every cut removed a bit of material, so kerf = gap ÷ (number of pieces + 1). The tool does the math once you enter the measured gap.
Slot fit — the comb
Calipers are not always at hand, and what really counts is how a part fits in practice. The comb is a row of slots as wide as the sheet is thick, each with a different offset (e.g. every 0.05 mm). Slide a piece of the same sheet into the slots and find the one where it sits snugly without a hammer. That slot's offset is your ready kerf compensation for the box generator.
Focus ramp
Even perfect settings will not help if the focus is off — the line comes out wide and the cut shallow. The ramp is a strip set at an angle: one end raised, the other lowered, with a zero mark in the middle. The laser draws a line along it and you look for the spot where the line is thinnest. If it is not at zero, the scale tells you how far to raise or lower the head.
Save the result so you never test twice
Most time is lost repeating the same test because the result stayed on a sticky note next to the laser. With a Laser MTS account you save the measured kerf and the best settings to Material inventory in one click. After that, the box, money box and puzzle generators take thickness and kerf from it, and QR codes, clock faces and maps also take power and speed for the LightBurn file.
Without an account the test works in full too: download the .lbrn2 or SVG file and a CSV layer legend with the power and speed of every field.
Frequently asked questions
What power and speed should I use to cut 3 mm plywood?
It depends on the laser — a 10 W diode and a 60 W CO₂ need completely different settings. So instead of a single number we recommend a power × speed grid in cut mode: one test shows the fastest setting that cuts through your sheet.
How wide is a laser kerf?
Usually 0.1–0.3 mm, but it depends on the laser, lens, focus and material. Measure it with the strip or the comb test — it takes a few minutes and pays off in every box you make.
Does the test file work with xTool or software other than LightBurn?
Yes. The .lbrn2 file is for LightBurn, and the SVG opens in other laser software — the layers have separate colors and each field's power and speed are in the CSV legend.
Do I need an account for the tests?
No. Material tests are free and need no account. An account is only useful for saving the result to Material inventory, which other modules use.