 Laser MTS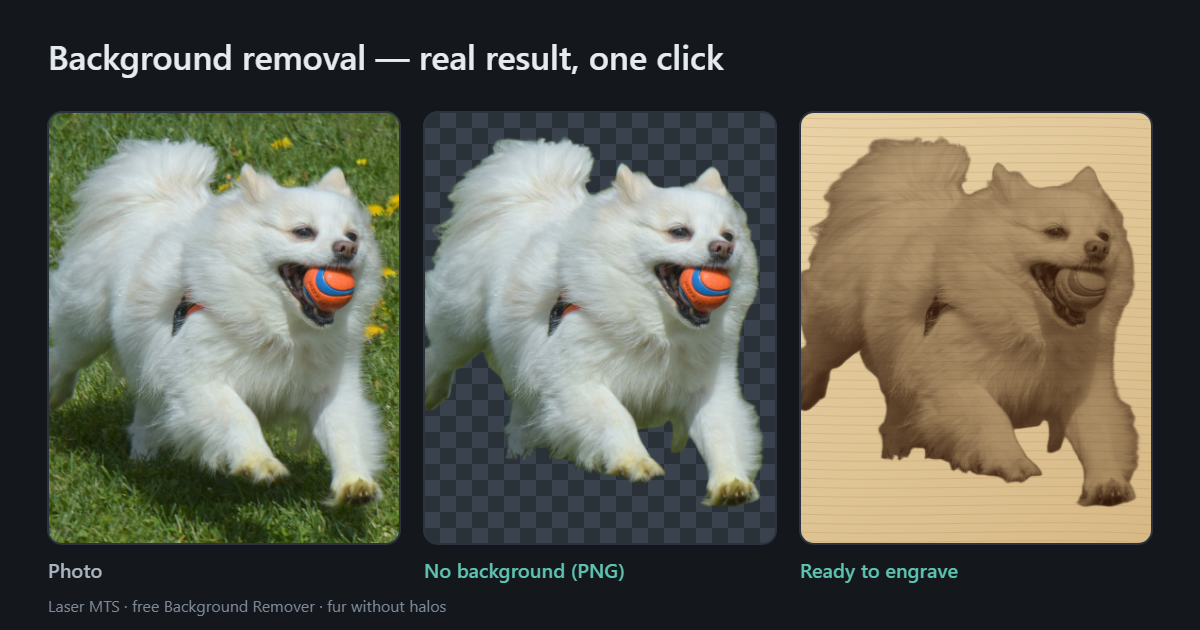
In short
- The background of an engraving photo burns as a dark rectangle around your subject. Remove it and the laser burns only the subject, leaving clean wood around it.
- The hardest part is hair, fur and fluff — edge pixels are partly transparent. A bad mask leaves a gray haze that the laser burns as a dirty outline.
- A good AI does it in seconds. The free Laser MTS Background Remover runs in your browser, at full resolution, with no watermark — the photo never leaves your computer.
- You can turn the result straight into a cut line around the subject (like a sticker) and cut the figure out of plywood.
Why remove the background before lasering
A laser does not know what matters in a photo. Every pixel darker than white is a signal to burn. The grass, wall or couch behind the dog turns into a dark, uneven patch and the subject gets lost in a rectangle. Once the background is gone, there are three typical routes:
- Engrave just the subject — a dog, portrait or car without background, on clean wood. It looks far better than a photo in a box and saves laser time.
- Cut out the shape — a plywood silhouette: an ornament, magnet or stand-up figure. You need a clean outline of the subject for that.
- UV printing and product shots — the subject on a transparent background for printing, a catalog or a web shop.
Why hair and fur are the hardest
At the edge of a mug, a pixel is either mug or background. At the edge of fur it is different: a single hair is thinner than a pixel, so the pixel holds a bit of the dog's color and a bit of the lawn's. A good mask is not black and white — it has semi-transparent edges that reproduce that mix.
That is where simple tools make two classic mistakes. The first is hard, scissor-cut edges — the fur looks like modeling clay. The second is a green or gray fringe: semi-transparent pixels keep the color of the old background. On screen it is a detail, but the laser burns that haze as a dirty halo around the subject.
So for engraving it pays to harden the edge (fewer semi-transparent pixels), and for cut-out shapes to use a fully black-and-white mask. For a product photo it is the other way round: a soft edge looks most natural.
How AI does it (and what we measured)
Background removal models learn from tens of thousands of photos with hand-made masks. Before choosing a model for Laser MTS, we compared the best openly licensed models on independent test sets — ones none of them saw during training: 49 portraits and 47 photos of objects with fine detail.
| Model | Error on portraits | Error on objects |
|---|---|---|
| BiRefNet (in Laser MTS) | 2.8 | 39.1 |
| BEN2 | 5.2 | 46.5 |
The error is the average difference between the model's mask and the reference mask (lower is better). On portraits BiRefNet made almost half as many mistakes as the runner-up, and it was also the most accurate on finely detailed objects. Models with non-commercial licenses were ruled out straight away — they cannot be used in a tool for businesses.
Removing a background step by step — for free
- Upload a photo (JPG, PNG, WebP) — you can also paste it from the clipboard or add several at once. The AI starts right away, no “Start” button.
- Pick “What is it for?”: Photo, online store, UV print (soft, natural edge), Laser engraving (hardened edge, no background specks) or Cutting along the outline (black-and-white mask). Fine-tune any mode with the “Edge hardness” slider.
- Look at the “Check” view for leftover background. The Restore brush brings back part of the subject, Erase takes away background, and Remove piece deletes a separate blob in one click. Every stroke can be undone.
- Enter the width on the material in mm and download the PNG — the DPI is saved in the file, so LightBurn opens it at the right size straight away. Several photos download as one ZIP file.
The first photo takes longer because the browser downloads the AI model (once — then it is cached). After that, a photo takes about 2 seconds on a graphics card. Without one, the tool runs a lighter model on the processor — slower, but still accurate.
From a cut-out photo to a cut line
Once the background is gone, the “Laser-cut around it →” button sends the result to the free Shape & Outline tool. There you set how far from the subject the cut line runs (like a sticker margin), and the tool joins separate parts with bridges so nothing falls out after cutting. The engraving goes on one layer, the outline on another — and your ornament or figure is ready.
If you need a clean vector (say, a logo in a photo), choose “Convert to vector →” and the image goes to the Vectorizer. If the photo is too small, “Upscale →” sends it to the AI Upscaler. For how many pixels a laser needs, see How to upscale an image without losing quality.
What to watch out for
- A subject the same color as the background (a white dog in snow, a black cat on a dark couch) is hard for AI too. Look at the edges in the “Check” view and touch them up with the brush.
- Glass, smoke, a veil — truly transparent things have no single edge. For engraving it is usually fine; for print, look at the result up close.
- A small phone photo is still small after cutting out. An 8-inch engraving needs a few thousand pixels — upscale first, then engrave.
- Photo rights — engrave your customer's photos or ones you have the rights to. Being able to remove the background does not change the photographer's rights.
Frequently asked questions
Is the background remover really free?
Yes — no account, no photo limit, no watermark and at the original's full resolution. Many free tools give you only a downsized image for free; here you get the full size.
Is my photo uploaded anywhere?
No. The AI model runs in your browser and the photo never leaves your computer. Only the model itself is downloaded from our server — once, then your browser keeps it.
What format do I get?
A transparent PNG (with DPI saved for the size in mm), WebP or a black-and-white mask. Several photos at once — in a single ZIP file.
How do I prepare a background-free photo for engraving?
Choose the “Laser engraving” mode, enter the width in mm and download the PNG. In your laser software, use image engraving mode (e.g. dithering). If you want full control over contrast, dots and a preview on the material, that is what the Photos for engraving module in the Laser MTS toolkit is for.