 Laser MTS
In short
- Most laser shops use Baltic birch (hard, even, few voids) or poplar/basswood plywood (light, cheap, cuts faster). MDF cuts evenly but smokes a lot and crumbles in thin parts.
- Whether a sheet cuts clean depends mostly on the glue: a thin, light interior glue line burns through far easier than the thick, dark line of exterior phenolic glue.
- Voids and overlaps in the core cause uncut spots and scorching at random places on the sheet.
- “3 mm” often measures anywhere from 2.8 to 3.2 mm. For finger joints and slots, measure every batch with calipers — the error is the same size as your kerf.
- Store sheets flat and dry, and let a new batch sit in the shop for a day or two before cutting.
Types of sheet goods compared
Five kinds of board show up in laser shops. Each has its place — trouble starts when a sheet bought “for ornaments” ends up in a box with tight joints.
| Board | Best for | Pros | Cons | How it cuts |
|---|---|---|---|---|
| Baltic birch | Finger-joint boxes, structural parts, engraving | Hard and dense, thin plies, few voids in good grades, clean edge | Heavier and pricier, needs more power | Slower than poplar, but consistent across the sheet |
| Poplar / basswood ply | Ornaments, tags, models, big runs | Light, cheap, pale color | Soft (dents easily), less even engraving, voids more common in cheap sheets | Fast, at lower power |
| “Laser-grade” plywood | Anything where repeatability matters | Thin glue lines, patch-free faces, tight thickness | Costs more; the label is a seller’s claim, not a standard | Usually the most even — if the maker sticks to the spec |
| MDF | Templates, backgrounds, parts to be painted | No plies, no grain, same everywhere, cheap | Lots of smoke and smell, dark sooty edge, brittle in thin parts, swells with moisture | Even and predictable; needs good exhaust |
| Hardboard (HDF) | Backers, signs, jigs | Thin (typically 1/8″), dense and stiff, cheap | Often smooth on one face only, smokes like MDF | Thin sheets cut fine, but it needs more power than MDF of the same thickness |
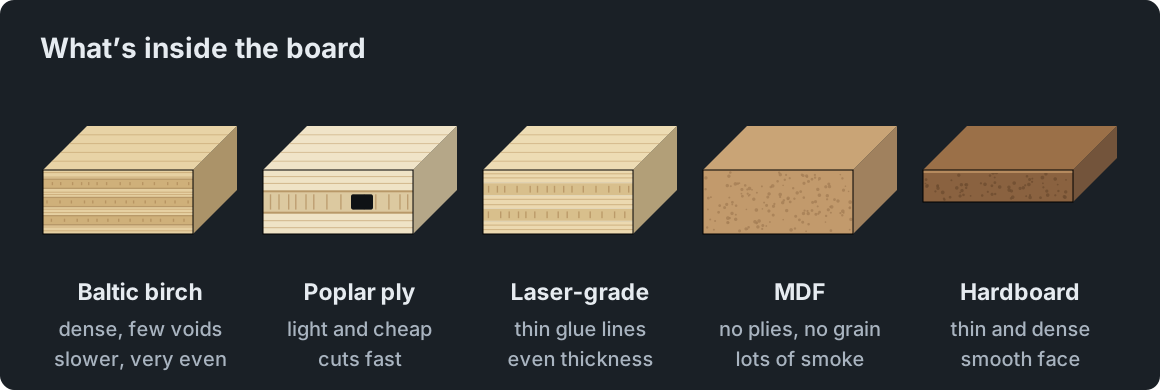
Poplar plywood is much lighter (roughly 25–31 lb/ft³ vs about 40–44 lb/ft³ for Baltic birch). Less wood to vaporize means faster cutting — but also a softer face that dents and engraves less evenly.
What to avoid: construction plywood (often pine, with knots and resin pockets), OSB and any board with an unknown coating. A film or laminate on the face may be PVC, and PVC never goes in a laser.
The glue — why one 1/8″ sheet cuts like butter
Plywood is thin layers of wood (veneers) glued cross-grain. The laser vaporizes wood easily. A glue line is different: cured resin that chars instead of disappearing. The more glue in the beam’s path, the more power you need and the more soot you get on the edge.
- Urea-formaldehyde (UF) — interior plywood, with a thin, light glue line. Usually the easiest to cut.
- Phenolic (PF) — exterior or marine plywood, often marked WBP. The glue line is dark brown and clearly visible. Harder for a laser: slower, sootier, more likely to leave parts hanging.
- Melamine-urea (MUF) — somewhere in between: more moisture resistant than UF, usually easier to cut than phenolic.
How to tell before you buy: look at the edge. Thick, dark lines between plies almost always mean phenolic glue. When ordering online, ask about the glue type and whether the panel meets the US formaldehyde rules (TSCA Title VI, formerly CARB Phase 2). Smoke from any glued board contains glue breakdown products, so venting outside is a must — see our laser cutter safety guide.
Voids, overlaps and patches
The second source of “random” problems hides in the core. Veneer pieces don’t always meet perfectly:
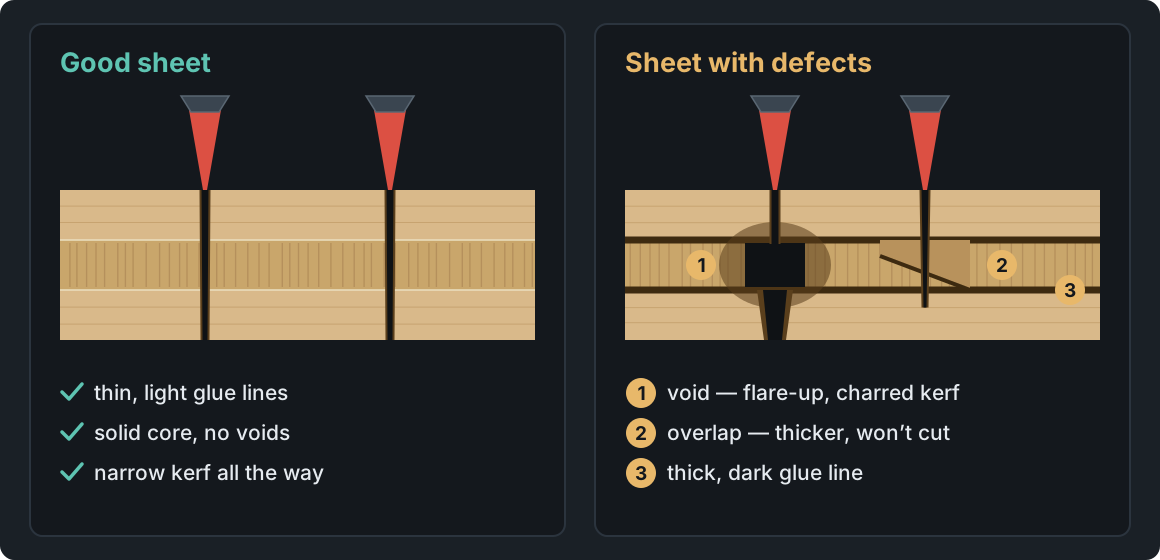
- Void — a gap between core veneer pieces. The beam hits air, smoke and flame collect there, and the kerf in the bottom ply comes out wide and charred.
- Overlap — two veneer pieces lie on top of each other. The sheet is thicker there and the laser doesn’t cut through.
- Knots and patches — a knot is harder than the surrounding wood, and a patch (a plug covering a face defect) engraves a different color.
The telltale sign: most parts drop out, but a few hang on by one or two spots. Raising power for the whole file won’t fix it — you’ll just scorch every other edge. Set such sheets aside for simpler jobs, or re-cut only the problem spots.
A grade describes the faces, not the core. Baltic birch is graded by its faces (e.g. B/BB: B has no patches, BB has color-matched patches), US hardwood plywood uses letters A–D. For engraving, use a patch-free face, and ask about the core directly or check it with a test cut.
Thickness tolerance: 1/8″ is not 0.125″
Baltic birch is made in metric thicknesses: “1/8 inch” is really 3 mm (0.118″) and “1/4 inch” is 6 mm (0.236″). Domestic 1/4″ hardwood plywood often measures closer to 7/32″ (about 5.5 mm). On top of that, thickness varies by a few tenths of a millimeter between batches, and sometimes across a single sheet.
Nobody notices on an ornament. On a box, you notice right away. A box generator turns the thickness you enter into finger length and slot width for dividers or the bottom. If the sheet is 3.2 mm and the design assumes 3.0:
- a divider won’t go into its slot without sanding,
- fingers at the corners sit 0.2 mm below the panel face,
- with a 2.8 mm sheet it’s the opposite: dividers rattle and fingers stick out.
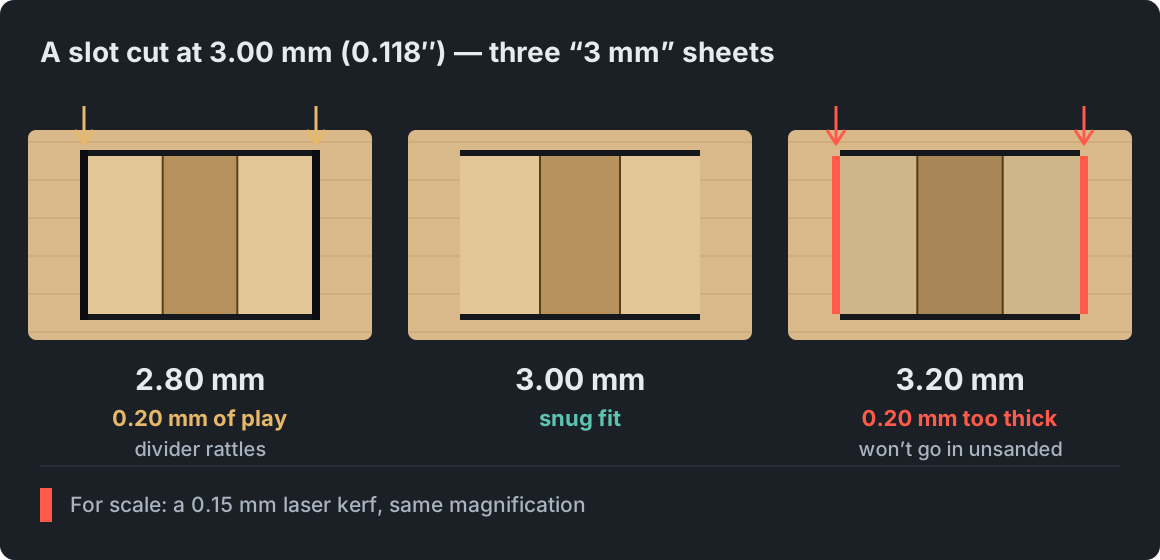
So measure every new batch with calipers at 4–5 spots on the sheet (corners and center) and enter the measured average, not the nominal 1/8″. If one sheet varies by more than 0.2 mm (0.008″), keep it for jobs without joints. The best real-world check of slot fit is a fit comb — see Laser material test: power, speed and kerf.
Cut settings — a starting point, not a recipe
The values below are only a rough start for your first test. Two machines with the same power rating can differ by a factor of two, and then there’s the lens, focus, air assist and the sheet itself.
| Board | CO₂ laser, about 60 W | Diode laser, about 10 W optical |
|---|---|---|
| Poplar / basswood 1/8″ | 60–70%, 20–30 mm/s, 1 pass | 100%, 5–8 mm/s, 1–2 passes |
| Baltic birch 1/8″ | 60–70%, 12–20 mm/s, 1 pass | 100%, 3–5 mm/s, 2 passes |
| MDF 1/8″ | 60–70%, 12–20 mm/s, 1 pass | 100%, 3–5 mm/s, 2 passes |
| Baltic birch 1/4″ | 70–85%, 6–10 mm/s, 1 pass | 100%, 2–4 mm/s, 3–5 passes |
Speeds are in mm/s, LightBurn’s default (1 in/s ≈ 25 mm/s). Start at the fast end of the range and slow down until the whole test area cuts through. The fastest setting that cuts gives the least charring. If edges still come out scorched, see how to prevent laser burn marks.
Storage and warping
Wood takes up and releases moisture, and plywood that spent a week leaning against a wall can bow by several millimeters. On the laser that means focus is right on only part of the sheet — near the edges the cut suddenly stops going through.
- Flat, on a level shelf or pallet, with light weight on top of the stack. Never on edge.
- Dry, at a steady temperature — not next to a heater or the garage door.
- Wrapped until you use it, especially in humid summers and dry winters.
- Acclimate: a new delivery sits in the shop for 1–2 days before it goes in the laser.
Hold down a slightly warped sheet with pins or weights outside the cut area, or cut it into smaller blanks. How to set and check focus is covered in our laser focus guide.
Spot a bad batch in 10 minutes
- Edge. Count the plies, check the glue lines (thin and light, or thick and dark), look for gaps in the core.
- Calipers. 4–5 readings per sheet. Write the average on the pack; variation over 0.2 mm is a warning sign.
- Flatness. Lay the sheet on a flat table and check whether the corners rock.
- Tap test. A dull, hollow sound in one spot can give away delamination or a large void.
- Test cut. A row of small circles (e.g. 3/8″ or 10 mm) across the diagonal at proven settings. A circle that doesn’t drop out marks a void, overlap or knot.
- A test on a scrap for every new supplier: a power × speed grid and a kerf measurement.
The last step is easy to skip, because “it’s the same plywood.” In Laser MTS, Material tests are free and need no account: they build a power × speed grid, a kerf test and a fit comb as a ready LightBurn file. With an account you save the measured thickness, kerf and best settings to Material inventory, and the box generator takes them from there instead of a nominal 1/8″.
Frequently asked questions
What is the best plywood for laser cutting?
For precise parts and boxes — good-grade Baltic birch, ideally with interior (UF) glue or sold by the maker as laser plywood. For light decorations and large runs — poplar or basswood plywood. Whatever you choose, test every new batch.
Can you laser cut exterior or marine plywood?
You can, but it’s usually harder. Phenolic glue needs more power or a slower speed, leaves more soot and a darker edge. If you don’t need water resistance, buy interior plywood.
Is 1/8-inch Baltic birch really 1/8 inch thick?
No. It is metric: nominally 3 mm (0.118″), and actual sheets can vary by a few tenths of a millimeter. Measure with calipers and enter the real value in your box design.
Why won’t my laser cut through plywood in some spots?
Usually a void or overlap in the core, a knot, a thicker glue line or a warped sheet that drifts out of focus. Before raising power for the whole file, check whether the problem is in one spot or across the sheet.