 Laser MTS
In short
- A QR code is a grid of modules: the smallest version is 21 × 21, the largest 177 × 177. Shorter content = fewer modules = bigger cells at the same size.
- Leave a quiet zone of 4 modules of blank background on every side — without it the scanner can’t find the edge of the code.
- A module must be clearly larger than the laser spot, and engraved cells grow with dot gain — shrink them in the file or turn on compensation.
- On dark materials (slate, black acrylic, anodized aluminum) you engrave the background, not the modules — an inverted code.
- Error correction M or Q is a sensible start, H when you add a logo. Scan a test piece with several phones before the batch.
How a QR code is built
The QR code was developed by the Japanese company Denso Wave, and its structure is defined in the ISO/IEC 18004 standard. The code is made of square modules — dark and light cells. How many there are depends on the version: version 1 is 21 × 21 modules, every next version adds 4 per side, and version 40 is 177 × 177. More content and a higher error correction level mean a higher version.
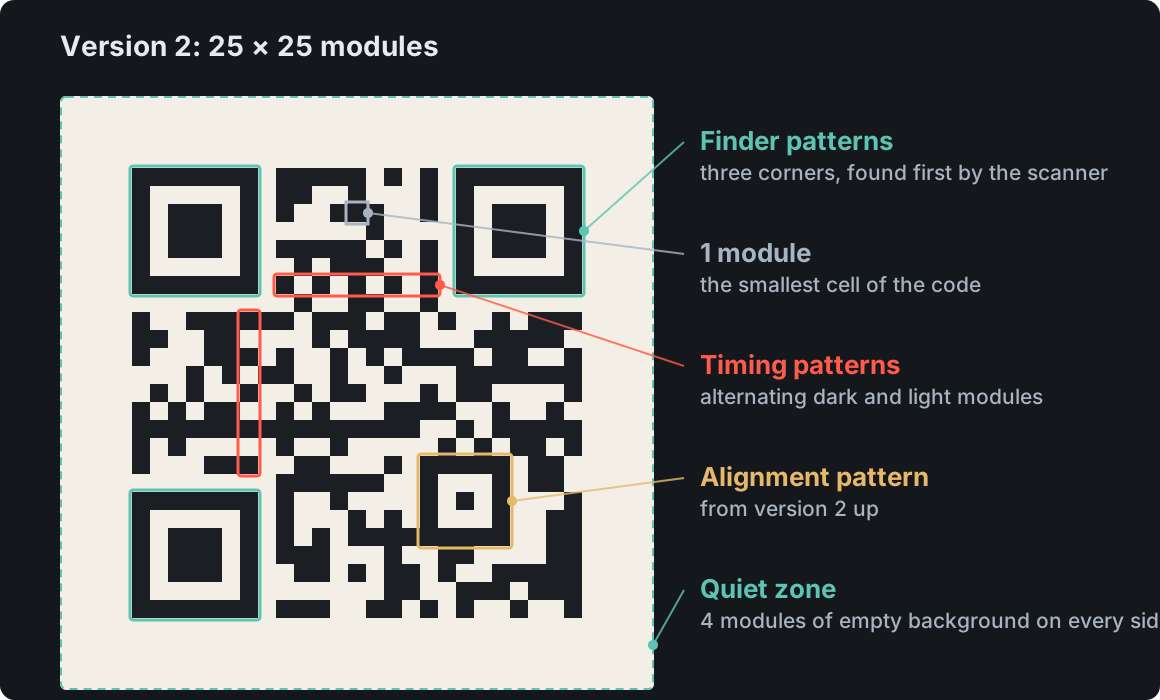
The three large squares in the corners are the finder patterns — they let the scanner locate the code and read it at any angle. The smaller square near the bottom-right corner (from version 2 up) helps straighten the image, and the alternating lines between the finders define the grid. Around the code the standard requires a quiet zone of 4 modules of blank background on every side. On a plywood tag that means plain wood — at least four cells wide — between the code and the edge of the tag, the string hole or any lettering.
Module size vs laser spot
A laser doesn’t burn a perfect square, it burns a spot: typically about 0.1–0.25 mm (0.004–0.01″) on a CO₂ machine and smaller on a diode (xTool lists 0.08 × 0.06 mm for the D1 Pro). For a cell to come out as a readable square, the module has to be several times larger than the spot. Denso Wave’s advice for printing is at least 4 printer dots per module — apply the same rule to a laser: module ≥ 4–5 spots. With a 0.2 mm spot, don’t go below about 1 mm (0.04″) per module; with a diode 0.5 mm can work, but on wood the grain and scorching work against you, so a bigger cell always scans more reliably.
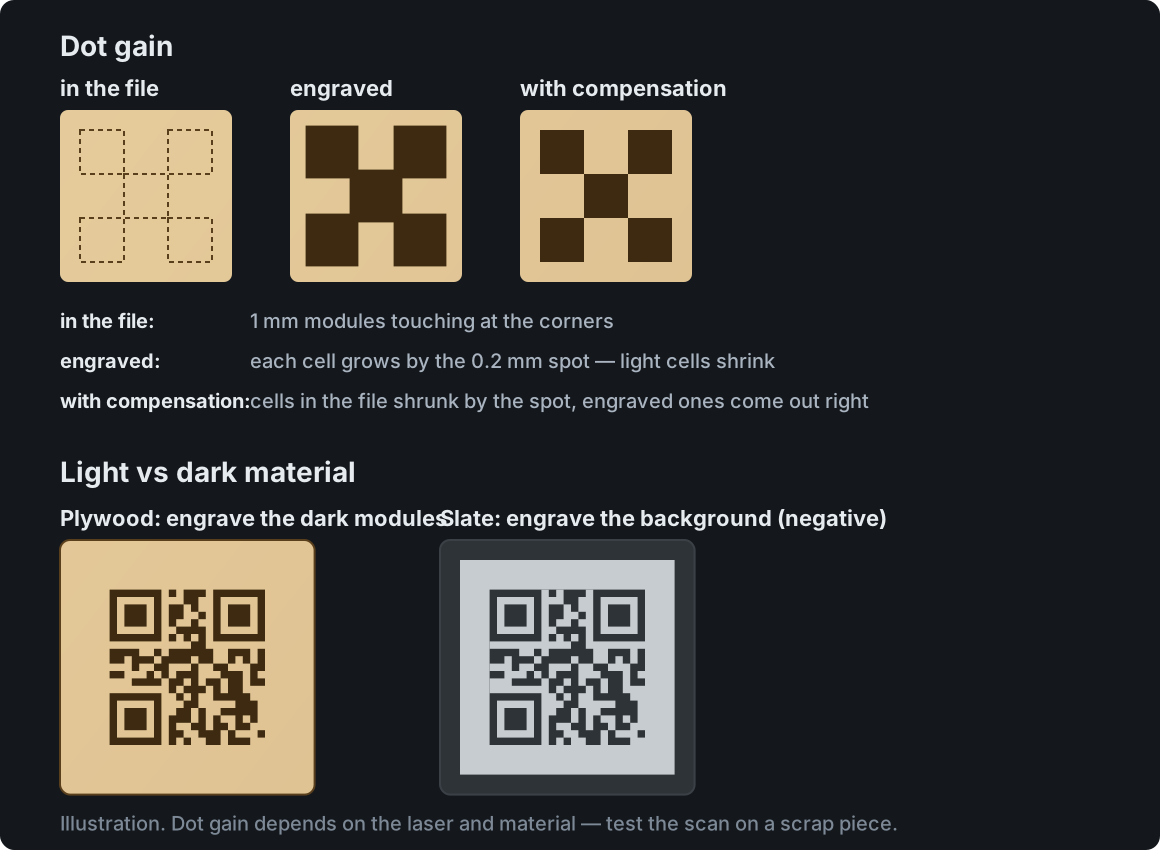
The second trap is dot gain. An engraved cell is bigger than in the file — the spot reaches past the edge, and wood darkens next to the burn as well. Dark modules grow, light ones shrink, and the code loses its balance of black and white. With 1 mm cells and a 0.2 mm spot, a light cell between two dark ones shrinks to about 0.8 mm. Two tips:
- Shrink the dark cells in the file by half the spot on each side (compensation) — after engraving they come back to the right size. Some generators do this for you.
- Don’t overdo the power. A QR code doesn’t need to be deep — it needs contrast. Lower power and higher speed mean less dot gain and less of the brown haze between modules. Pick the settings the same way as in our guide to laser engraving wood.
Shorter link = bigger cells
Module size at a given code width comes from simple division: width ÷ (number of modules + 8 for the quiet zone). The only thing you control is the number of modules — that is, the length of the content.
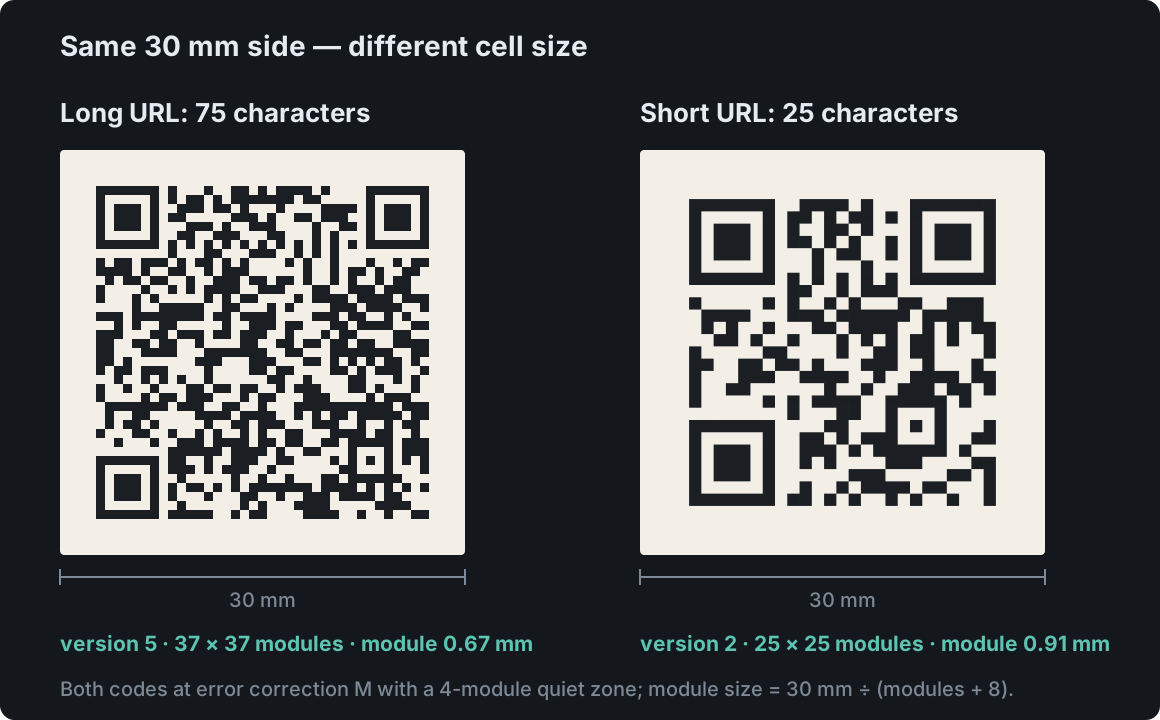
A URL like https://www.shop.com/products/12345?utm_source=qr&utm_medium=print is 75 characters and needs version 5 (37 × 37). The same link shortened to 25 characters fits version 2 (25 × 25): at a 30 mm (1.2″) side the module grows from 0.67 to 0.91 mm. What helps:
- A URL shortener or your own short redirect (
shop.com/q1). Bonus: you can change the destination later without replacing the sign. - No tracking parameters in the address, and no
wwwif the site works without it. - A vCard with name, company, phone, email and website easily passes 150 characters — version 9 (53 × 53), and at 30 mm the module is half a millimeter. On wood make such a code bigger (50–60 mm, 2–2.4″) or encode just a link to a page with the details.
Error correction and logos
QR codes have built-in error correction at four levels: L recovers about 7% of damaged data, M 15%, Q 25%, H 30%. A higher level means more modules (the same address fits version 2 at L but needs version 3 at H), but also more tolerance for scratches, grain and uneven burning. For engraving, M or Q is a sensible start.
A logo in the middle of the code works precisely because of error correction: the scanner rebuilds the covered modules from the redundant data. The rules: level H, a logo clearly smaller than that 30% of the area (keep a reserve for damage from the burn), and never over the finder patterns in the corners. And always a scan test — with and without the logo.
Contrast: light and dark materials
The scanner looks for dark modules on a light background. On light plywood (birch, poplar), maple or light cork you engrave the dark modules — as in the file. On dark materials the laser mark is light: gray on slate, white on anodized aluminum (the laser removes the dye), matte gray on black acrylic. There you engrave the background and leave the modules dark — an inverted code, quiet zone included. Most phones read inverted codes, but some older scanner apps struggle with them — one more reason to test. More on light marks on dark materials in our guide to engraving beyond wood.
Materials that hurt contrast: pine and other strongly grained woods (a dark grain line looks like a module), reddish and brown species (little contrast with the burn), glossy surfaces (glare in the camera). Engraving through masking tape, or a light sanding after the burn, removes the brown haze between modules and noticeably improves scanning.
Fill, not outline
Modules are raster engraved (“Fill” mode in LightBurn) — every dark module is a filled area. An outline only (“Line”) gives thin borders of little squares that the scanner won’t treat as dark cells. Set the line interval so the fill is solid, with no light stripes; a denser raster only adds time and depth. If your software generates the code as vectors, connected modules should be one outline — otherwise the laser burns the shared edges twice.
LightBurn has its own generator: up to version 1.6 it is “Tools → Create QR Code”, from 1.7 “Create Bar Code”, with raw content, Wi-Fi and contact-card options and an error correction slider. Shrinking the modules for the spot and inverting the code you do yourself there.
What to encode: link, Wi-Fi, contact, phone
The phone recognizes the type of content by its format. The most common ones in a workshop:
| Content | Format | What the phone does |
|---|---|---|
| Website | https://… — always with https:// | opens the link in the browser |
| Wi-Fi | WIFI:T:WPA;S:network;P:password;; | offers to join the network — a “guest Wi-Fi” sign |
| Contact card | vCard (BEGIN:VCARD … END:VCARD) or the shorter MeCard | offers to save the contact |
| Phone | tel:+1-212-555-1212 — with the country code | offers to call |
Wi-Fi passwords and vCard names may contain special characters (;, :, ,) that these formats require you to escape with a backslash — a generator usually does it for you, but after typing by hand, check the scan. Accented characters are fine as long as the generator encodes the text as UTF-8.
Scan test before the batch
- Engrave a sample on a scrap of the same sheet, with the same settings, at the final size.
- Scan it with several phones — the built-in camera and an app, iPhone and Android — from the distance your customer will use. A popular rule of thumb: scanning distance is about 10 code widths, so a 30 mm (1.2″) code reads comfortably from 30 cm (12″); below 2 cm (0.8″) phones often struggle.
- Check in dim light and at an angle — on glossy finishes a reflection can hide a finder pattern.
- Compare the content: a typo in the address means a whole batch of signs in the bin.
- If the code doesn’t scan reliably: bigger cells (shorter content or a wider code), lower power, higher error correction — in that order.
In Laser MTS this is the job of the QR code for engraving module: enter a link, Wi-Fi details, a contact card or a phone number, set the code width, and it sizes the cells for your laser’s spot with compensation, prepares an inverted code for dark materials, lets you place a logo in the middle and checks the scan before you cut — the way a phone will see it after engraving. You can put the code straight onto a plate or a tag with a hole and download it as SVG, DXF or a LightBurn project with layers.
Frequently asked questions
How big should a laser-engraved QR code be?
Big enough that one module is several times larger than the laser spot — about 1 mm (0.04″) on a CO₂ laser, 0.5 mm and up on a diode. For a typical short link (version 2–3) that gives a code 25–40 mm (1–1.6″) wide including the quiet zone. The longer the content, the wider the code.
How much space should I leave around a QR code?
Four modules of blank background on every side (the quiet zone). With 1 mm modules that is 4 mm (about 5/32″) of plain material between the code and any edge, hole or lettering.
Will a QR code work on dark wood or slate?
Yes, if you engrave it inverted: the light background together with the quiet zone, leaving the modules dark. Phones read inverted codes, but check a sample — some older apps have trouble with them.
Why won’t my phone read an engraved QR code?
Most often: cells too small for the spot and dot gain, no quiet zone, grain or scorch haze between modules, content too long, a covered finder pattern. Start with bigger cells and less power.
Which error correction level should I use for engraving?
M or Q to start; H when you add a logo or the material is uneven (slate, strong grain). A higher level means more modules, so at the same width the cells get smaller.