 Laser MTS
In short
- Raster engraving burns an area line by line — for text, logos and photos. Vector (line) engraving traces a path once — for thin outlines and labels, many times faster.
- A 0.1 mm line interval (254 DPI) is a good starting point. Half the interval means twice the time and a darker, deeper mark; too wide an interval leaves visible stripes.
- Color and depth depend on the energy per square millimeter: slower, more power or a tighter interval = darker and deeper.
- Light, even woods engrave best: maple, Baltic birch, basswood, alder. Pine comes out striped, walnut shows little contrast.
- Before a customer job, burn a power × speed grid on a scrap of the same board.
Raster vs vector engraving
Laser software such as LightBurn gives you two ways to engrave. Raster (“Fill” or “Image” mode in LightBurn) works like an inkjet printer: the head sweeps back and forth and fires wherever the design is. That is how you burn solid areas, text, logos and photos. Vector engraving (“Line” mode) runs the beam along the path once and leaves a thin groove following the outline.
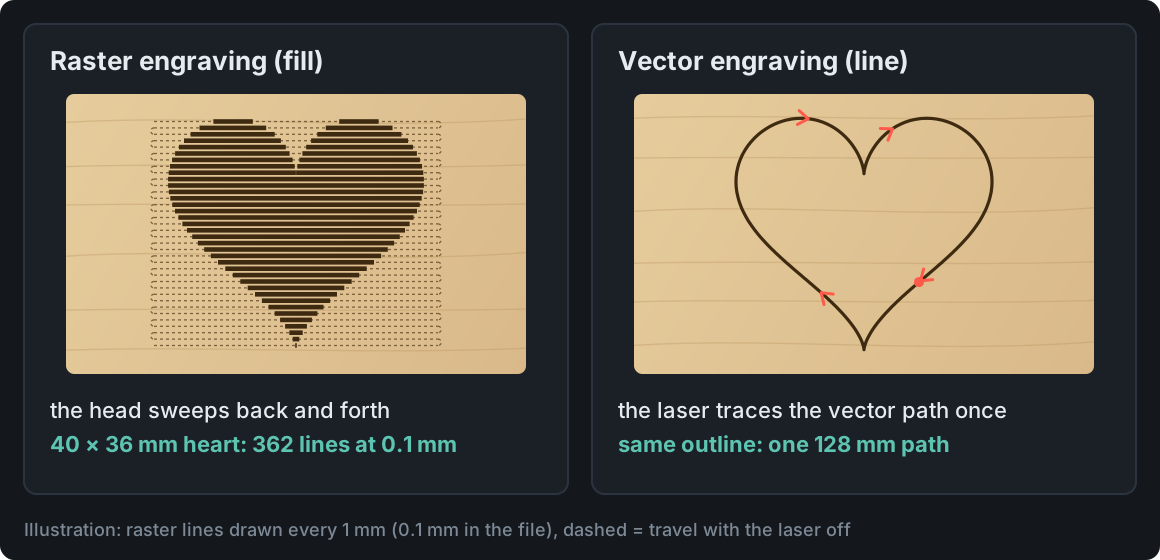
- Use raster when the design has areas: bold letters, logos, silhouettes, photos. The time depends mostly on the design’s height (the number of lines) and width — not on how detailed it is.
- Use line for thin outlines, single-line fonts, sketches and guide marks. On small parts that is seconds instead of minutes.
- Combine them: fill the area with raster, trace the border with a line. In the file that is just two layers with different modes.
One raster trap: two small labels in opposite corners of a board are engraved as one block by default, so the head scans across the empty middle. LightBurn’s “Fill shapes individually” (or “Fill groups together”) option engraves each one separately and can cut the job time noticeably.
Line interval and DPI
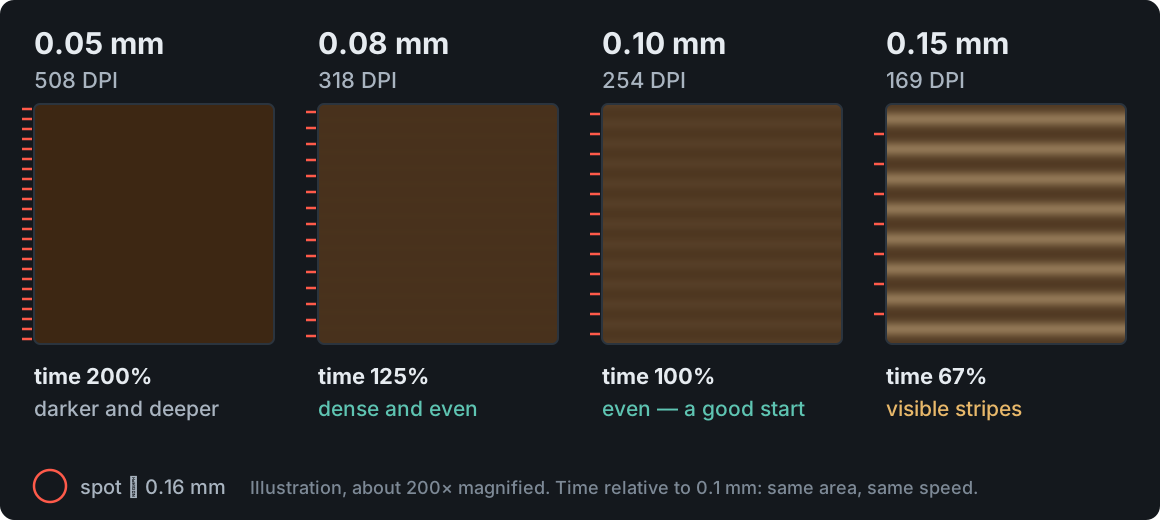
The line interval is the spacing between raster lines. Software shows it in mm or as DPI (dots per inch): DPI = 25.4 ÷ interval in mm. A good interval is a bit smaller than your laser’s spot, so neighboring lines overlap slightly and leave no light gaps.
| Interval | DPI | 4 × 4 in (100 × 100 mm) area at 300 mm/s | When |
|---|---|---|---|
| 0.05 mm | 508 | 2,000 lines, about 11 min | deeper engraving, very fine detail with a small spot |
| 0.08 mm | 318 | 1,250 lines, about 7 min | photos, small text |
| 0.10 mm | 254 | 1,000 lines, about 5.5 min | starting point for text, logos and fills |
| 0.15 mm | 169 | 667 lines, about 3.7 min | large fills with a wide spot; otherwise stripes |
The times cover line travel only (100 mm ÷ 300 mm/s per line, bidirectional; 300 mm/s ≈ 12 in/s). Acceleration, turnarounds and overscan add to that, but the ratio holds: half the interval, twice the time. A tighter raster also burns darker and deeper because every millimeter gets more energy — re-check your power after changing the interval.
DPI beyond what your spot can resolve adds time, not detail. If you don’t know your spot size, burn a few patches at different intervals and look at them with a loupe: you want the widest interval that shows no light gaps.
Power and speed: color and depth
The color of the mark comes down to how much energy lands on each square millimeter — roughly power ÷ (speed × interval). That gives you three simple rules:
- Darker and deeper: lower speed, higher power or a tighter interval. Half the speed delivers about as much energy as double the power.
- Lighter and shallower: the opposite. A light, caramel-brown mark usually comes from high speed and moderate power.
- Deep engraving (for a paint fill, say) works better as several faster passes than one very slow pass — less scorching and a flatter bottom.
The same settings on another species, or even another batch of plywood, give a different color. So instead of hunting for “the right settings” in forum tables, burn a grid: power rises across the columns, speed down the rows, and you see the whole range at once. The free Laser MTS Material tests generate this grid in engrave mode — every field on its own layer with power and speed already set, as a LightBurn file or SVG. How to read the result is covered in Laser material test: power, speed and kerf.
Engrave with the focus on the wood surface. A wide, soft mark and weak contrast despite good settings usually mean the focus is off — see our laser focus guide.
Overscan and bidirectional engraving
Two raster settings are behind most “mystery” defects: dark edges on filled areas and fuzzy letter edges.
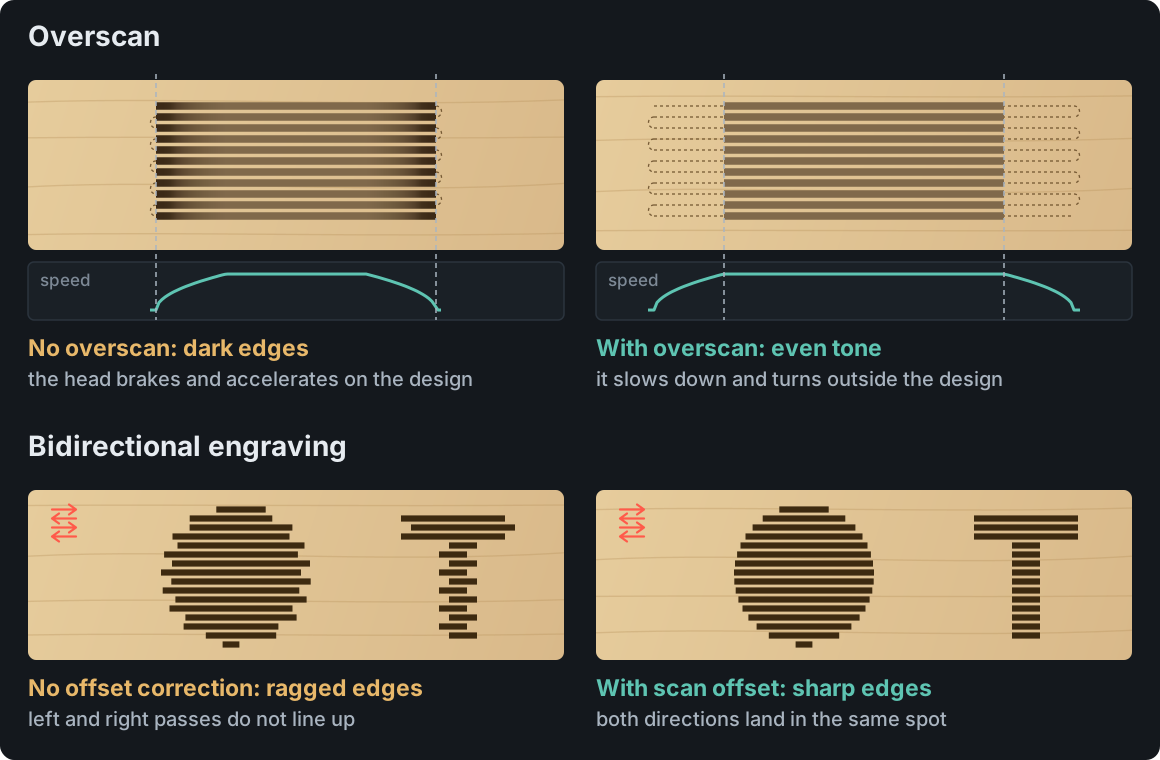
- Overscan — the head can’t turn around instantly. It brakes at the end of every line and accelerates at the start of the next; if that happens on the design, the slower stretches get more energy and the edges come out darker. Overscan extends each pass beyond the design so braking and turning happen with the laser off. In LightBurn it is the “Overscanning” option in the layer settings. It costs a little time and is almost always worth it on wood.
- Bidirectional engraving — the laser fires in both directions, which saves time. But the beam responds with a tiny delay and the belts have some play, so right-going lines shift against left-going ones. Result: ragged, “ghosted” vertical edges. LightBurn fixes this with the Scanning Offset Adjustment table in Device Settings — you enter the shift for a few speeds. Quick workaround: engrave in one direction only (slower) or drop the speed.
The test is simple: engrave a large “I” or a vertical bar at your everyday speed and check the left and right edges with a loupe. A sawtooth on every other line means offset, dark edges mean no overscan.
Wood species — how the engraving comes out
Engraving is controlled scorching, so light woods with even density give the best contrast. Woods with strong grain burn unevenly: soft earlywood burns deeper than hard latewood.
| Wood | How it engraves | Watch out for |
|---|---|---|
| Hard maple | light background, even dark mark | one of the best for photos and small text |
| Baltic birch plywood | light, even, good contrast | deep engraving can reach the glue line — a darker, uneven bottom |
| Poplar plywood | light, lightweight | softer than birch, so less even; cheap sheets can hide voids under the face veneer |
| Basswood | very light, soft, even | easy to burn too deep — more speed or less power |
| Alder | light brown, even | an affordable choice for signs and coasters |
| Cherry | warm reddish tone, nice contrast | darkens with age, so contrast drops a little |
| Red oak | strong grain and open pores | the engraving “wanders” with the grain — fine for text, weak for photos |
| Pine | striped | soft bands burn deeper than hard ones; resin scorches and stains |
| Walnut | dark background | low contrast; better as a deep engraving filled with paint |
| MDF | even brown, no grain | holds detail well, but smokes and smells of glue — you need good extraction |
Choosing the plywood itself (glue, face grade, voids in the plies) has its own post: Best plywood for laser cutting.
Masking tape: when it helps and when it doesn’t
Engraving smoke settles around the design as a brown haze, and on light, resinous wood it can be hard to remove. Tape applied before engraving catches that residue — peel it off and the surface is clean.
Tape helps with
- large fills and deep engraving (lots of smoke)
- light woods where every stain shows
- paint fills: spray over the tape, peel it — color stays only in the grooves
Watch out
- paper tape only (transfer tape) — never vinyl, which is often PVC
- tape changes your settings: you need a bit more energy
- on small letters, weeding the leftovers takes longer than the engraving
- usually not for photos — it shifts the tones
Instead of tape, some shops brush on a single thin coat of clear finish before engraving: the residue can’t soak into the pores and wipes off with a cloth. More ways to deal with scorching are in How to prevent laser burn marks.
Engraving and cutting in one file
In your laser software every line color is a layer with its own mode, power and speed. A coaster with text is typically three layers: raster (the text), line (a border) and cut (the shape). Order matters:
- Engrave first, while the part is still held by the whole sheet and can’t move.
- Then the lines — borders and labels.
- Cut last, inner holes before the outer outline. A part that is cut free early can drop or tilt, and everything after it lands in the wrong place.
In LightBurn you set the order in the layer list, and the “Cut inner shapes first” optimization option takes care of holes.
Finishing after engraving
- Cleaning — brush the soot out of the grooves with a soft brush. Surface haze comes off with fine sandpaper (220–320 grit) along the grain; keep in mind sanding makes a shallow engraving lighter. Many shops also use a slightly damp melamine sponge — test on a scrap first, since water raises the grain.
- Oil brings out the grain but darkens the whole surface, so the engraving loses contrast. On a cutting board, use a food-safe oil.
- Clear finish, especially water-based, changes the color the least. Apply it only after thorough cleaning, or you’ll seal the soot under the coat.
- Paint or epoxy in the grooves — with a deep engraving and masking tape, this is the easiest way to get colored text on dark wood.
What about photos?
A photo is also a raster, but with shades of gray — and wood under a laser handles two states best: burned or not. Hence dithering, lifting the midtones and inverting the image on dark materials. We walk through it step by step, on a real photo, in How to laser engrave a photo on wood.
Frequently asked questions
What power and speed should I use for engraving wood?
There is no single number — a 10 W diode and a 60 W CO₂ laser need completely different settings, and maple reacts differently than pine. Start with medium power and high speed, then burn a power × speed grid on a scrap of the same wood and pick the fastest field with a good color.
What DPI is best for laser engraving wood?
Start at 254 DPI (0.1 mm interval). For photos and small text, 318 DPI (0.08 mm) is common. Higher DPI only pays off with a small spot — otherwise it just makes the job longer.
Why does my engraving have lines or stripes?
Usually the interval is wider than the spot (light gaps between lines), the laser is out of focus, or the wood has strong grain that burns unevenly. A sawtooth on every other line is a bidirectional scan offset issue.
Can a diode laser engrave wood?
Yes, it’s one of the things diode lasers do best. They engrave wood and plywood beautifully — they are just slower than a CO₂ laser on large areas.
How do I clean smoke stains after engraving?
Brush out the soot and sand the surface haze lightly along the grain. Next time, apply paper masking tape before engraving, or seal the wood with a thin coat of clear finish.