 Laser MTS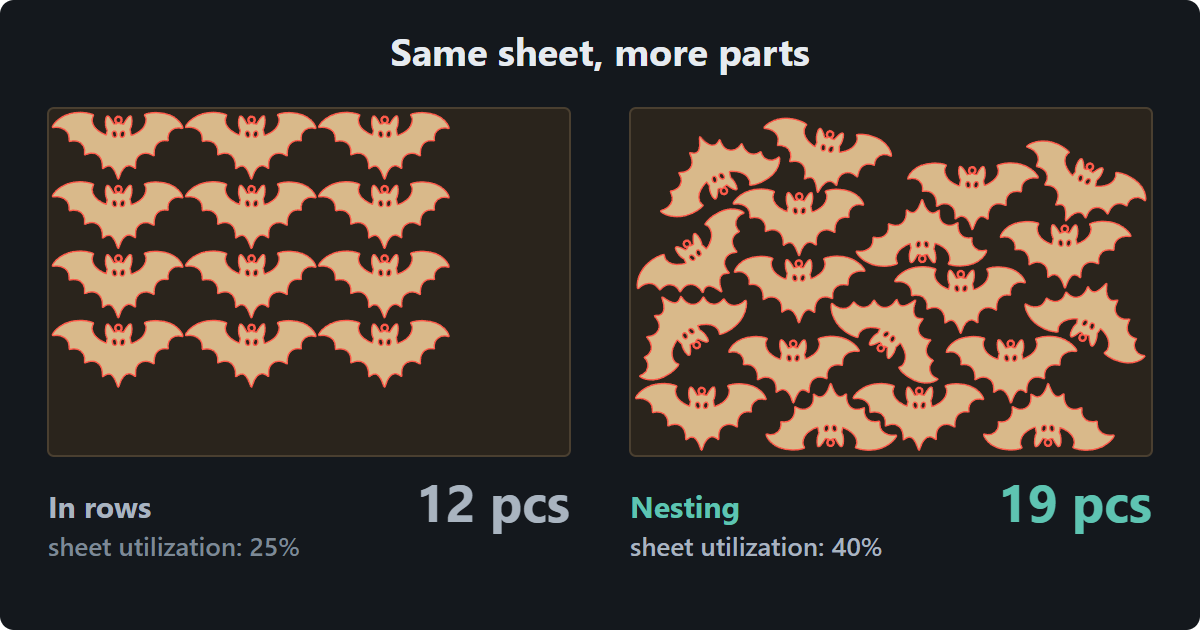
In short
- Nesting means arranging parts on a sheet to fit as many as possible while keeping part spacing and an edge margin.
- In the bat example the same sheet holds 19 parts instead of 12 — 37% fewer sheets for the same order.
- The gain depends on the shape: irregular parts (wings, points, tabs) gain a lot; circles and hearts in rows gain almost nothing.
- Limit rotation when grain direction matters, and never mirror parts that carry engraving.
- Common-line cutting shortens the cut (by 30% in the example), but you have to remove duplicate lines and plan the cut order.
What nesting is
Nesting is how you lay out parts on a sheet before cutting. The goal: fit as many parts as possible without breaking the rules of cutting — spacing between parts, a margin from the edge, and grain direction when it matters. Sheet goods cost money, and whatever is left between the parts usually goes in the bin.
The number to watch is sheet utilization, also called material yield — the area of the cut parts divided by the area of the sheet. You’ll never reach 100% with anything but rectangles: the bat on its own fills only 44% of its bounding box. So 40% is a good result for this shape — and going from 25% to 40% means more than a third fewer sheets for the same order.
Manual vs automatic nesting
Rows take a minute in your laser software: copy the part into a grid (Grid Array in LightBurn). For rectangles and circles that’s often good enough. With irregular shapes, though, every part takes up its whole bounding rectangle.
By hand you can do better: rotate every other part, slot wing into wing, squeeze a few parts along the edge. Two bats turned 90° in the free strip on the right give you 14 instead of 12. Getting to 19 means fitting every part to its neighbors — that can easily take half an hour, and you start over whenever the size or the sheet changes.
| Method | Bats per sheet | When it makes sense |
|---|---|---|
| Rows (grid array) | 12 | circles, rectangles, one-offs, quick batches |
| By hand, a few rotated at the edge | 14 | a handful of irregular parts when you have no nesting software |
| Automatic nesting | 19 | batches, irregular shapes, many different parts at once |
On one sheet the difference is a few parts. On a batch it’s a few sheets — or a dozen.
Worked example: what scrap costs you in a month
Assumptions (an example): 1/8″ (3 mm) Baltic birch, a 600 × 400 mm sheet at $7.50 (laser-grade sheets this size run roughly $5–10 depending on grade and supplier), a 150 mm (5.9″) bat, 3 mm spacing, 5 mm margin. Rows fit 12, nesting fits 19.
| Order | In rows | Nested | You save |
|---|---|---|---|
| 100 pcs | 9 sheets — $67.50 | 6 sheets — $45.00 | 3 sheets, $22.50 |
| 300 pcs | 25 sheets — $187.50 | 16 sheets — $120.00 | 9 sheets, $67.50 |
| 1,000 pcs | 84 sheets — $630.00 | 53 sheets — $397.50 | 31 sheets, $232.50 |
Now picture a month in a shop that cuts about 1,000 parts like this. The material in the bats themselves is worth about $159. In rows you pay $630 for sheets, so about $470 goes to scrap; nested, about $240. Add 31 fewer sheet changes: at 2 minutes a sheet, that’s an hour of your time, or about $43 at a $42/h shop rate. Call it roughly $275 a month, over $3,000 a year — on one shape and the cheapest sheet stock. Cutting time itself doesn’t change: there’s the same length of line to cut. With acrylic or hardwood a sheet costs several times more, and so does the difference. How to build scrap into a job price is covered in our guide to laser cutting pricing.
Not every shape gains that much. Same sheet and settings, one shape at a time:
| Shape | In rows | Nested | More parts |
|---|---|---|---|
| Heart 70 × 63 mm (2.8 × 2.5″) | 40 | 40 | 0% |
| Tree 56 × 72 mm (2.2 × 2.8″) | 50 | 54 | +8% |
| Star 72 × 68.5 mm (2.8 × 2.7″) | 35 | 40 | +14% |
| Bat 150 × 77 mm (5.9 × 3.0″) | 12 | 19 | +58% |
The more notches, tabs and wings a part has, the more nesting pays off. Circles, hearts and rectangles already pack well in rows — there, sensible spacing and staggering every other row by half a part do more.
Rotating and mirroring parts
You gain the most space by rotating parts so a bump on one slots into a notch on the next. In the bat layout, 10 of the 19 parts are rotated and 9 are mirrored. A mirrored part with no engraving is just the same part flipped over. But you need to rein that in in three cases:
- Engraving, text, logos. Rotation is fine — the engraving turns with the part. Mirroring reverses the text, so never mirror a part that carries engraving.
- Material with a good side — a nicer face veneer, mirror acrylic, two-color engraving laminate. A mirrored asymmetric part (a letter, left and right side panels) has to be flipped after cutting, and then the good face ends up underneath.
- Grain direction — more on that below.
Check whether your software lets you turn mirroring off, and look at the sheet preview before cutting — backwards text jumps out immediately.
Small parts inside holes and gaps
The center of a photo frame, the inside of a wreath or the letter O is material that normally drops into the tray. If the order includes small parts (tags, letters, tokens), put them right there — that’s part-in-part nesting. The same goes for gaps between large parts: there’s plenty of room between bat wings.
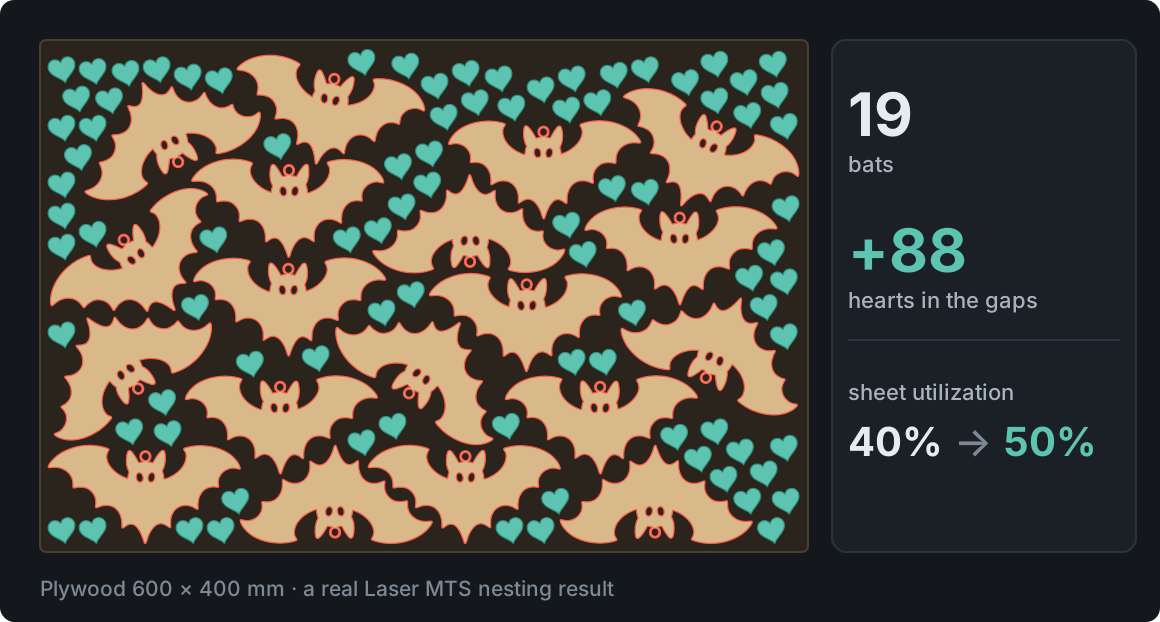
Fillers make sense when you can sell or use them: a freebie in the package, gift tags, samples. The material is nearly free, laser time isn’t: the 88 hearts add almost 6 m (19 ft) of cut line, more than half of what the 19 bats take (about 11 m, 36 ft). With small parts, keep two more things in mind:
- Cut order. The small part first, then the hole, then the outline of the large part. If you cut the hole first, its center — with the spot for the small part — can drop or shift. In LightBurn, “Cut inner shapes first” in the optimization settings takes care of this.
- Small parts vs. the bed. Parts smaller than a honeycomb cell fall through or tip over, and the beam hits their edge. Support them with pins or add tabs that hold them in the sheet.
Part spacing: kerf and heat
Spacing in your software is measured between design lines — the centers of the cuts. The beam takes the kerf out of that, usually 0.1–0.3 mm (0.004–0.012″) depending on the laser, lens and material. At 0.5 mm (0.02″) spacing, what’s left between two cuts is a strip of wood thinner than half a millimeter.
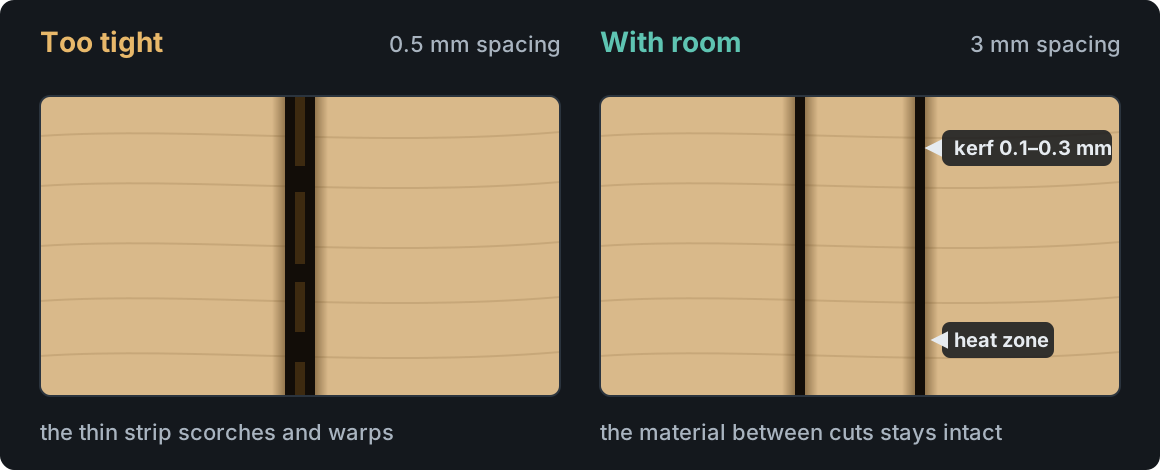
Kerf isn’t the whole story. A thin strip between two cuts has nowhere to shed heat: it darkens, warps, can burn through or catch fire, and both parts come out with darker edges — see how to prevent laser burn marks. A starting point:
- 1/8″ (3–4 mm) plywood, MDF and acrylic: 2–3 mm spacing (about 1/16–1/8″).
- Thicker stock (1/4″, 6 mm and up): e.g. 4–5 mm (about 3/16″) — the cut takes longer and puts more heat into the sheet.
- Edge margin: 5 mm (3/16″) or more. Sheet edges get dinged, and focus drifts at the edge of a warped sheet.
The surest answer is a test on your own machine: cut pairs of rectangles at 1, 2 and 3 mm spacing (roughly 0.04, 0.08 and 0.12″) and see where the strip stays light-colored and stiff. Measure the kerf itself with a laser material test.
Grain direction
With plywood, the grain of the face veneer matters for two reasons:
- Looks. Box sides or a set of coasters look consistent when the grain runs the same way on all of them. Engraving across the grain can also come out differently than along it.
- Strength of thin parts. Typical 1/8″ Baltic birch has three plies, and the two outer ones run the same way. A narrow strip cut along the face grain has its fibers running lengthwise in two plies out of three; across the grain, in only one. So line up thin fingers, hanger loops and letters with narrow bridges along the grain.
In nesting terms, that means rotating only by 0° and 180° — the grain stays parallel. You usually fit fewer parts, so lock rotation only where grain really matters. MDF, hardboard and acrylic have no grain. Face veneers and grades are covered in best plywood for laser cutting.
Common-line cutting
Rectangular parts can be placed edge to edge, with no gap, so a single line cuts two parts at once. That’s common-line cutting.
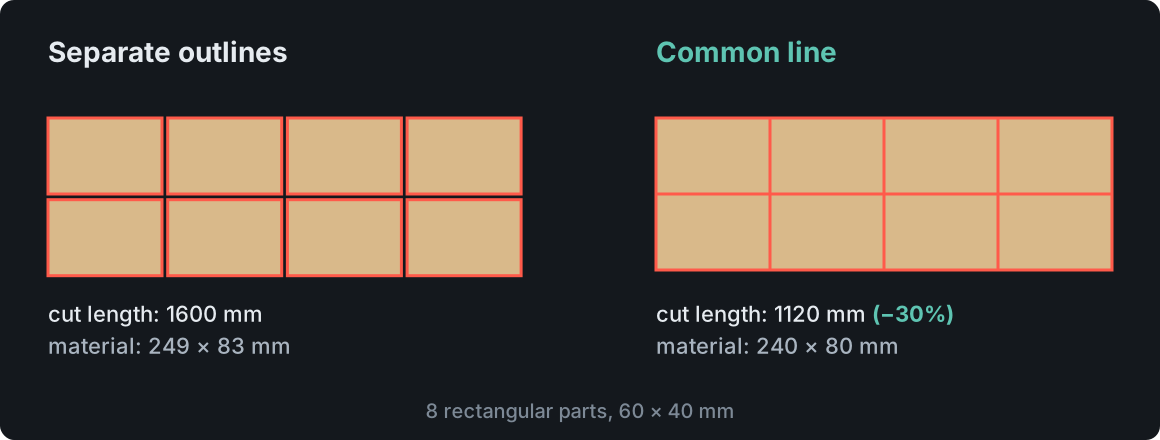
The upsides are real: a shorter cut (1,120 instead of 1,600 mm in the example), less material and less heat in the sheet. So are the risks:
- Duplicate lines. Pushing parts together doesn’t create a common line — the file still has two outlines on top of each other, and the laser cuts that edge twice: a wider, scorched kerf and double the time. Delete the duplicates (in LightBurn: Edit → Delete Duplicates) — more in laser cutting file mistakes.
- Part size. On the shared edge each part loses half a kerf, same as with separate outlines. But if you compensate for kerf (e.g. for press-fit joints), space the parts exactly one kerf apart and cut a single line down the middle.
- Parts shifting. Once a common line is cut, the part is held on fewer sides and can shift, so the next cut lands off target. Cut row by row from one side and add tabs to small parts.
- Intersections and curves. Where lines cross, the beam passes twice — you may get darker dots at tile corners. And curves on two different parts practically never line up, so common lines make sense for rectangles and polygons: tiles, signs, dividers.
For press-fit joints and parts where every tenth of a millimeter counts, start with separate outlines.
Offcuts and remnants
Almost every job leaves a piece of sheet behind: a strip along the edge, a corner, a sheet full of holes. Toss it and it’s a loss. Stash it unlabeled and a month later nobody remembers whether it was 1/8″ or 3/16″. A simple system:
- Label it right away: material, thickness measured with calipers, date.
- Store it flat — a thin offcut leaning against the wall warps fast. Strips narrower than your smallest part plus two margins can go.
- Start new jobs with offcuts, especially small parts and test cuts.
- Price the remnant in. If an order leaves a quarter sheet you won’t use, charge for the whole sheet.
Offcuts have one catch: an irregular shape, which is exactly where laying parts out by hand takes longest. This is where automation makes the biggest difference. Laser MTS nesting lays parts out by their actual shape and rotates them, drops small filler parts from your library into the empty spaces, and lets you add an offcut from a photo — it finds the usable material on it, around holes from earlier jobs too, and places parts there before reaching for a new sheet. For many orders at once, automated order nesting spreads the whole job across as many sheets as it takes. You download the result as SVG, DXF or a LightBurn project (.lbrn2).
Frequently asked questions
What is nesting in laser cutting?
It’s arranging parts on a sheet so as many as possible fit while keeping the spacing and edge margin. Less scrap means fewer sheets for the same order and fewer sheet changes.
How much material does nesting save?
It depends on the shape. In the examples above: nothing for hearts, 8–14% more parts for trees and stars, and 58% more parts (37% fewer sheets) for bats.
How much space should I leave between parts when laser cutting?
For 1/8″ plywood and MDF, start at 2–3 mm (about 1/16–1/8″) and leave more for thicker stock. The kerf itself is only 0.1–0.3 mm, but a thin strip between cuts overheats and scorches.
Is common-line cutting worth it?
For batches of rectangular tiles, yes — the cut is shorter, by 30% in the example. For press-fit parts, small parts or curved edges, the risk usually outweighs the gain.