 Laser MTS
In short
- After import, measure one dimension you know. 75% or 133% means points and pixels got mixed up, 93.75% means a file from an old Inkscape version, and 25.4× off means inches and millimeters got swapped.
- Anything that should drop out needs a closed contour, and every cut line should exist only once.
- Convert text to paths, unlink clones and delete hidden layers.
- Details thinner than the kerf disappear. With a 0.2 mm (0.008″) kerf, a 0.3 mm tab is left with 0.1 mm of wood.
- One color = one operation. Two nearly identical reds can land on two layers with different settings.
Symptom → cause → fix
Find what you see on the machine or in the preview — details are below.
| Symptom | Cause | Fix |
|---|---|---|
| Part too small or too big | units: points instead of pixels, old Inkscape (90 DPI), DXF without units | save in real units or scale by the inverse of the error |
| Part won't drop out | open contour, gap in the outline | join the nodes, close the path |
| Text missing or changed | text not converted to paths | convert text to paths before saving |
| Wider, scorched kerf | double or overlapping lines | delete duplicates |
| Missing or extra lines | clones, symbols, hidden layers | unlink clones, delete hidden objects |
| Detail gone, tab breaks | detail thinner than the kerf | beef up the detail or engrave it instead |
| Engraving cut through | layer colors don't match operations | one exact color per operation |
| Laser engraves, not cuts | the file holds an image, not vectors | vectorize the image |
1. Wrong scale — the part comes out too small or too big
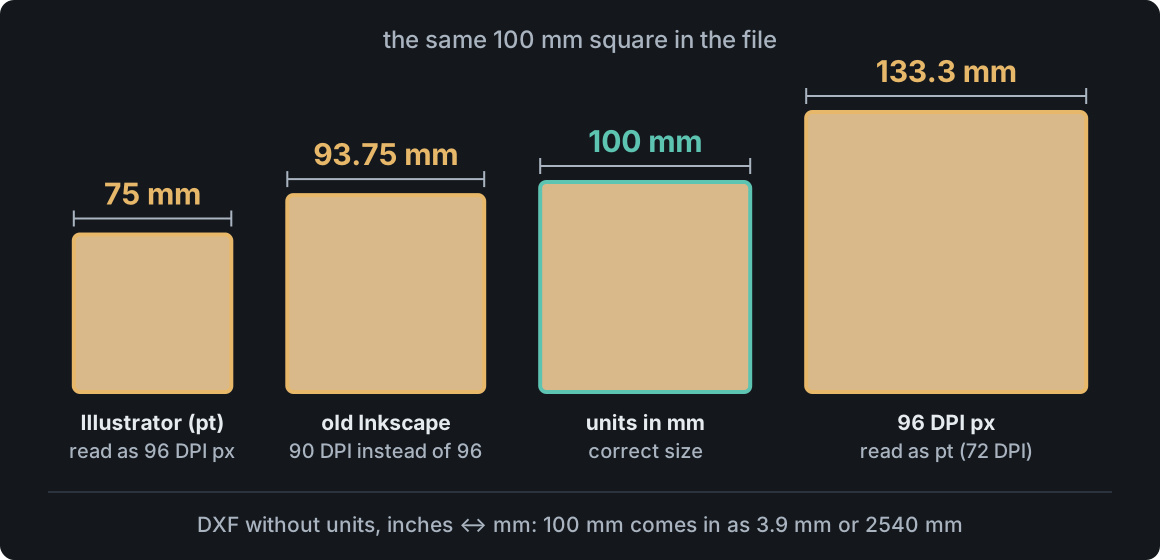
An SVG file doesn't always say what units it was drawn in. A width in millimeters or inches (width="100mm") is unambiguous. “Pixels” are the problem: your laser software has to assume how many make an inch, and design programs don't agree:
- Illustrator saves dimensions in points (72 per inch), often labeled as pixels. Software that assumes 96 pixels per inch imports the part at 75% of its size.
- Inkscape up to version 0.91 used 90 pixels per inch; newer versions use 96. An old file comes in at 93.75% — easy to miss, since a 100 mm (about 4″) part loses only about 6 mm (1/4″).
- DXF can store units in its header, but many programs never write them. Inches read as millimeters make the part 25.4× smaller (100 mm → 3.9 mm); millimeters read as inches make it 25.4× bigger.
The ratio between the size you got and the size you expected points straight to the cause:
| You got | Most likely cause | Scale by |
|---|---|---|
| 75% | points (Illustrator) read as 96 DPI pixels | 133.33% |
| 93.75% | old Inkscape file (90 DPI) read as 96 DPI | 106.67% |
| 133.33% | 96 DPI pixels read as points (72 DPI) | 75% |
| 25.4× smaller | DXF in inches read as millimeters | 2540% |
| 25.4× bigger | DXF in millimeters read as inches | 3.94% |
| 10× off | centimeters mixed up with millimeters | 1000% or 10% |
Fix: set the document units to millimeters or inches in your design program (in Inkscape: File → Document Properties) and save the file again. If you don't have the source file, scale the part in your laser software by the value from the table.
2. Open contours — the part won't drop out
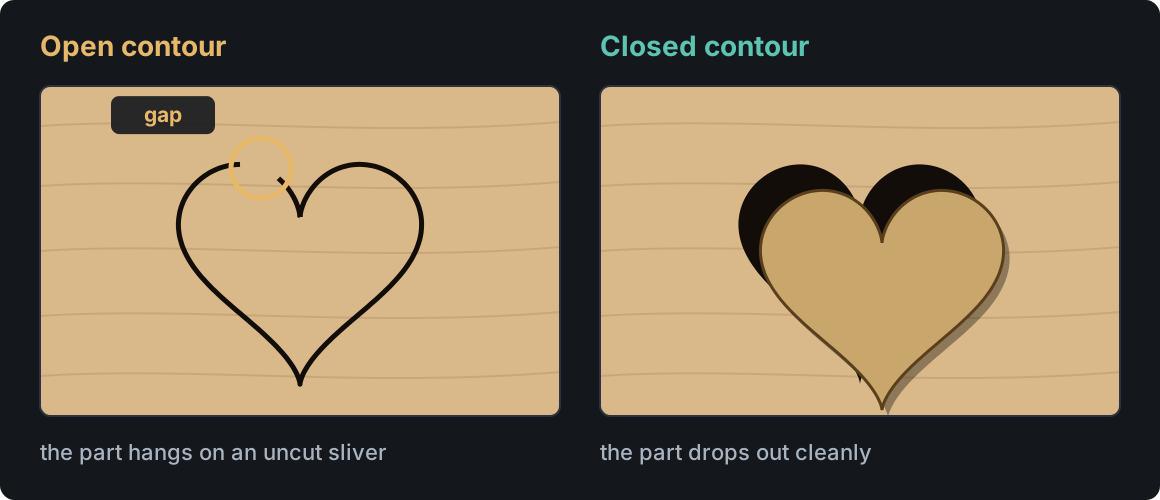
Symptom: the part hangs in the sheet by an uncut sliver. Sometimes your laser software also won't fill the shape with an engraving or offset the line, because it doesn't know what's inside.
Cause: the contour looks closed but has a gap — sometimes 0.01 mm, invisible at any zoom. Usually it's end nodes that were never joined, or a DXF from a CAD program where a rectangle is four separate lines and every fillet is a separate arc. A contour made of pieces cuts piece by piece, pausing at every end, which leaves dark dots.
Fix: join the end nodes. In Inkscape: Node tool, select both ends and join them (Shift+J). In Illustrator: Object → Path → Join (Ctrl+J, Cmd+J on a Mac). In LightBurn, Auto-Join in the Edit menu connects pieces whose ends touch. In CAD, join lines and arcs into one closed polyline before you export.
3. Text not converted to paths
Symptom: in your laser software the text is gone, shows up in a different font or at a different size.
Cause: SVG and DXF store text as characters plus a font name, not as letter shapes. If the computer opening the file doesn't have that font, the software substitutes another — with different letters and different dimensions. Some laser programs don't import SVG text at all.
Fix: convert text to paths before saving: in Inkscape Path → Object to Path (Shift+Ctrl+C), in Illustrator Type → Create Outlines (Shift+Ctrl+O). Keep a copy with editable text for later changes. If the text will be cut through, remember that the middles of “O”, “A” and “e” will drop out — use a stencil font with bridges, or engrave instead.
4. Double and overlapping lines
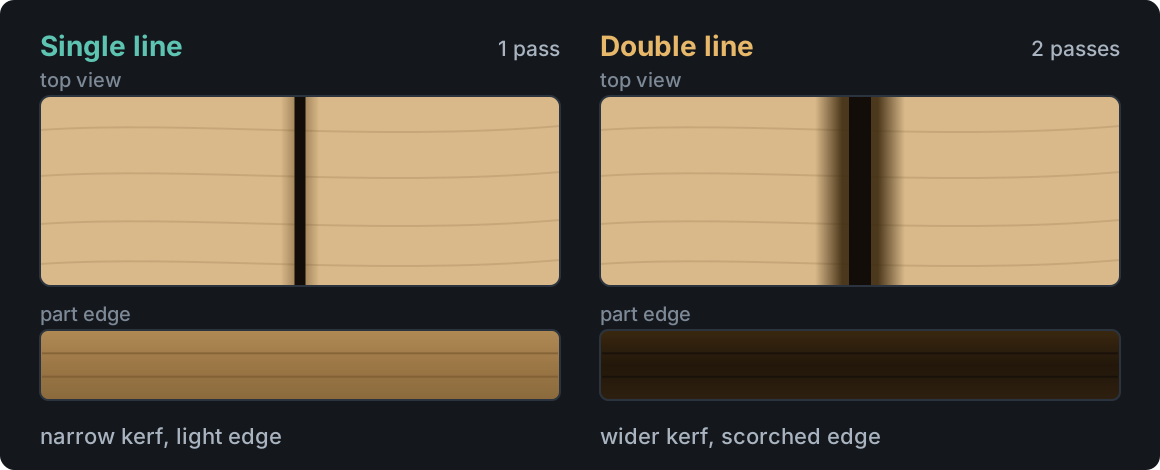
Symptom: along part of the outline the kerf is wider and darker, and in the path preview the head goes back over the same line.
Cause: two lines sit exactly on top of each other and look like one on screen. Usually it's a shape pasted in place (in Inkscape, Ctrl+D drops a duplicate right on the original), an edge shared by neighboring parts drawn as separate rectangles, forgotten construction lines, or a DXF with the same line on two layers. Every pass burns the kerf again — more on dark edges in How to prevent laser burn marks.
Fix: delete the duplicates — LightBurn's Delete Duplicates command in the Edit menu removes whole duplicated shapes. You can also cut a shared edge between neighboring parts only once on purpose; that has its own pros and risks, covered in Nesting for laser cutting.
5. Clones, symbols and hidden objects
Symptom: parts are missing in your laser software, a repeated shape sits in the wrong place, or the laser cuts something you never saw in the preview.
Cause: a clone (Alt+D in Inkscape) or a symbol (in Illustrator) isn't a shape in the file, just a reference saying “draw that object here”. Some laser programs skip it, others place it without rotation or scale; blocks in DXF work the same way. Hidden layers, objects outside the artboard and lines with no color are still in the file — some programs skip them, others import them and cut them.
Fix: unlink clones (Inkscape: Shift+Alt+D; Illustrator: Break Link to Symbol in the Symbols panel), and delete hidden layers and anything outside the artboard. The simplest habit is a separate “for the laser” file with only what should be cut or engraved.
6. Details smaller than the kerf
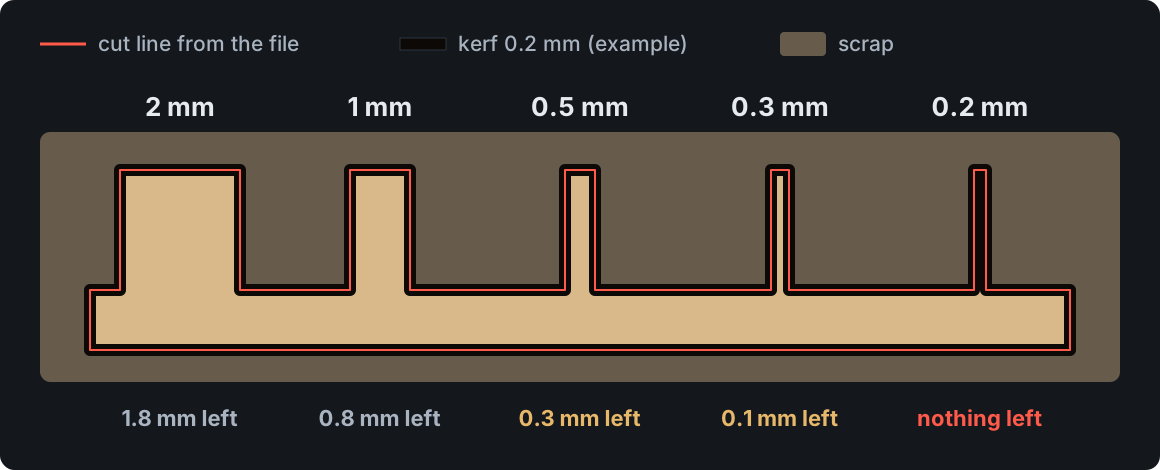
Symptom: thin tabs snap or burn through, small holes turn into a scorched dot, and small cut-out letters break when you pop them out.
Cause: the gap a laser burns — the kerf — is typically 0.1–0.3 mm (0.004–0.012″), depending on the machine, the lens and the material. The center of the beam follows the line in the file, so half the kerf disappears on each side of it. A 0.3 mm feature with a 0.2 mm kerf is left with 0.1 mm of wood. Heat adds to it: two cut lines close together scorch whatever is between them.
Fix:
- Measure the kerf of your machine on your material — see Laser material test.
- Design tabs with some margin. In 1/8″ (3 mm) plywood, anything narrower than about 1 mm (0.04″) is already very fragile, though a lot depends on the species and grain direction — test on a scrap.
- Engrave small text and ornaments instead of cutting them.
- Cut a hole for a screw or dowel on a scrap first and measure it — the kerf makes it bigger.
7. Layer colors
Symptom: an engraving gets cut through, some lines run at the wrong power, and after import there are more layers than you planned — or everything ends up on one.
Cause: laser software assigns lines to layers (operations) by color, so one color has to mean one operation. Trouble comes from:
- nearly identical shades, e.g.
#FF0000and#FE0000— the same red on screen, but they can land on two layers in your laser software, one of them with default settings; - a document in CMYK mode, where pure red ends up a slightly different shade after saving;
- engraving and cutting in the same color;
- a shape with a fill but no stroke — some programs handle it differently than you'd expect.
Fix: pick one convention for your shop, for example red #FF0000 — cut, black #000000 — engrave, blue #0000FF — score. Enter colors by hex code, not by eye from the palette. After import, count the layers: one per operation.
8. An image instead of vectors
Symptom: the laser engraves a rectangle with a picture instead of cutting the outline, and zooming in shows pixels.
Cause: an SVG or PDF can hold a plain PNG or JPG — the file is just a wrapper. That's what files from photo editors and online design tools often look like, and a customer's “logo.svg” is sometimes a JPG in disguise. The extension tells you nothing about whether there are lines inside.
Fix: vectorize the image — turn it into contours. How to do it well is covered in How to vectorize an image for laser cutting; the free Laser MTS Vectorizer does it right in your browser. An image meant for engraving can stay — just put it on an engraving layer.
Five-minute check before cutting
- Size. Measure one known dimension after import. If it's off, check the scale table above.
- Layers. As many layers as operations: cut, engrave, score.
- Path preview (the Preview window in LightBurn): the head shouldn't go back over the same lines or travel where you see nothing.
- Text, clones, hidden objects. Text converted to paths, clones unlinked, hidden layers deleted.
- First piece on a scrap before you run the whole batch.
With files from customers, you have to check all this on every job. Auto-Preflight in Laser MTS does it before cutting: it shows the detected units and the real size in millimeters, and marks open contours, double lines, text, clones, images, hidden objects, wrong colors and parts that are too small right on the preview. Closing a contour, removing a duplicate or expanding clones takes one click; text and images are only flagged, because those are your call. You save the fixed file as SVG, DXF or a LightBurn project.
Frequently asked questions
Why is my SVG the wrong size after importing it into LightBurn?
Usually units: an Illustrator file saved in points comes in at 75%, one from an old Inkscape version at 93.75%. Save the file in millimeters or inches, or scale it by the inverse of the error.
How do I convert text to paths in Inkscape?
Select the text and choose Path → Object to Path (Shift+Ctrl+C). From then on it's a regular shape that doesn't depend on the fonts installed on the computer. Keep a copy with the text for later edits.
Why does my laser cut the same line twice?
Because the file has two lines on top of each other — after pasting in place, along an edge shared by two parts, or in a DXF from CAD. Delete the duplicates before cutting, for example with Delete Duplicates in LightBurn.
What is the smallest detail a laser can cut?
It depends on the kerf (typically 0.1–0.3 mm, or 0.004–0.012″) and the material. A feature thinner than the kerf disappears, and one just slightly wider breaks or burns through. In 1/8″ (3 mm) plywood, design tabs from about 1 mm (0.04″) up and test them on a scrap.