 Laser MTS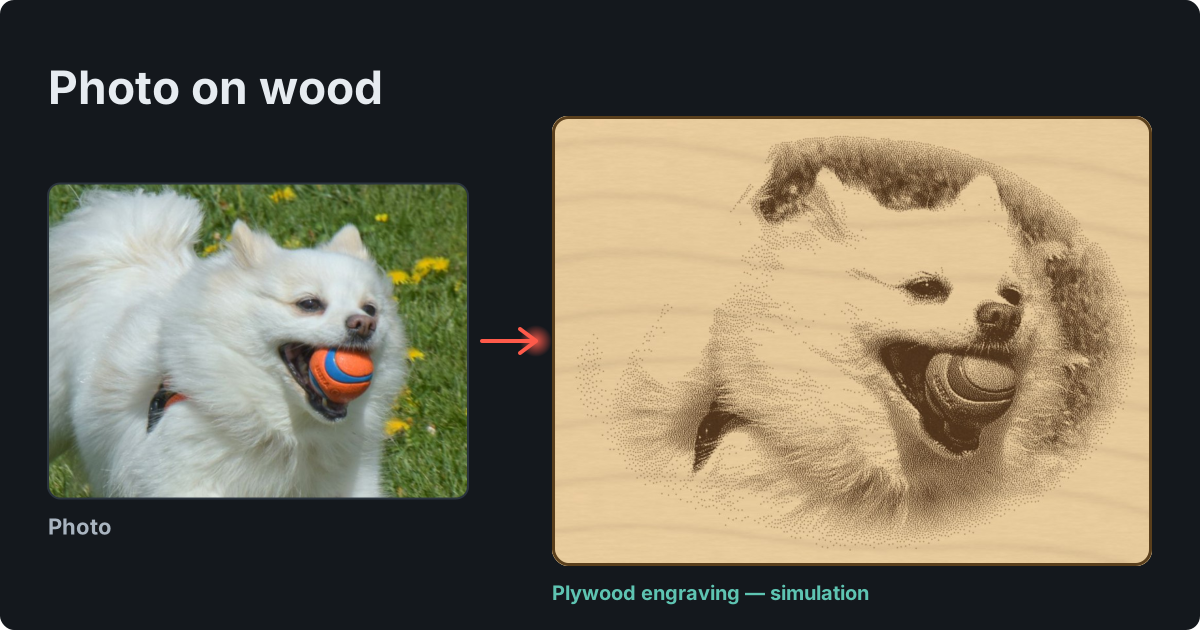
In short
- A good photo for engraving has sharp eyes, even light and a subject that stands out from the background. Ask the customer for the original file, not a screenshot from a messaging app.
- Work out the resolution from the size: pixels = inches × DPI. A 4 × 6 in photo at 254 DPI needs 1016 × 1524 px.
- Wood comes out darker than your screen. Lift the midtones, add contrast and sharpen before engraving.
- On wood a laser reliably does two states: burned or not. Shades come from dots of varying density (dithering).
- On slate, anodized aluminum and black acrylic the laser mark is light — you need to invert the image.
Which photos engrave well
A laser can’t add detail that isn’t in the photo, and it will lose some of what is there. Before you take the order, check:
- Sharp eyes. In a portrait of a person or a pet, people look at the eyes first. Blurry eyes mean a failed engraving, however good the rest is.
- Light from the side or front, without harsh shadows. Backlit faces turn into dark blobs, and on-camera flash flattens features.
- Subject size. The face should fill a big part of the frame. A face cropped out of a group shot is often only 200–300 px across — too little even for a small ornament.
- Background. The subject has to differ from it in brightness, not just color: a green sweater in front of a green hedge merges into one gray mass.
- The file itself. Photos sent through messaging apps or saved from social media are heavily compressed. Ask for the original from the phone.
A note on pets: a white dog on light wood is mostly bare wood with eyes and a nose, and a black cat easily becomes a dark blob. Both can be saved, but they need more work on brightness and contrast (below).
Crop, shape and background
Crop tight — the laser burns every square inch of background, so background costs time and attention. Popular shapes are a rectangle, a circle and an oval with a soft edge: the photo fades gently into bare wood, like an old portrait. A soft edge also forgives a slightly misplaced board.
With a busy background (a living room, a street, a forest) it’s best to remove it entirely and burn only the subject. AI does this in seconds today — how to get it right around hair and fur is covered in Remove the background from a photo for free.
How many pixels a photo needs
A laser engraves line by line, and every line corresponds to one row of pixels. So the resolution follows from the engraving size and the DPI you’ll engrave at (DPI = 25.4 ÷ line interval in mm):
pixels = inches × DPI (or mm ÷ 25.4 × DPI)
| Engraving size | 254 DPI (0.10 mm) | 318 DPI (0.08 mm) |
|---|---|---|
| 2 × 2.5 in (ornament) | 508 × 635 px | 636 × 795 px |
| 4 × 6 in | 1016 × 1524 px | 1272 × 1908 px |
| 5 × 7 in | 1270 × 1778 px | 1590 × 2226 px |
| 8 × 10 in | 2032 × 2540 px | 2544 × 3180 px |
A 12-megapixel phone photo (4000 × 3000 px) covers even 8 × 10 in with room to spare — as long as you don’t crop it hard. The trouble starts with crops from a small part of the frame and old scans. When pixels are short, upscaling with AI beats letting your laser software stretch the image with plain interpolation — see the difference in How to upscale an image without losing quality.
Which DPI to pick depends on your spot size and the material: on wood, usually 254–318 DPI. Line interval, overscan and engraving time are covered in Laser engraving wood: settings, DPI and finishing.
Brightness, contrast, gamma and sharpening
The laser spot is usually a bit larger than the line spacing, so neighboring dots merge and the wood around them darkens too. That’s why midtones come out darker than on screen. A photo that’s properly prepared for engraving looks too light and too sharp on your monitor — that’s the point.
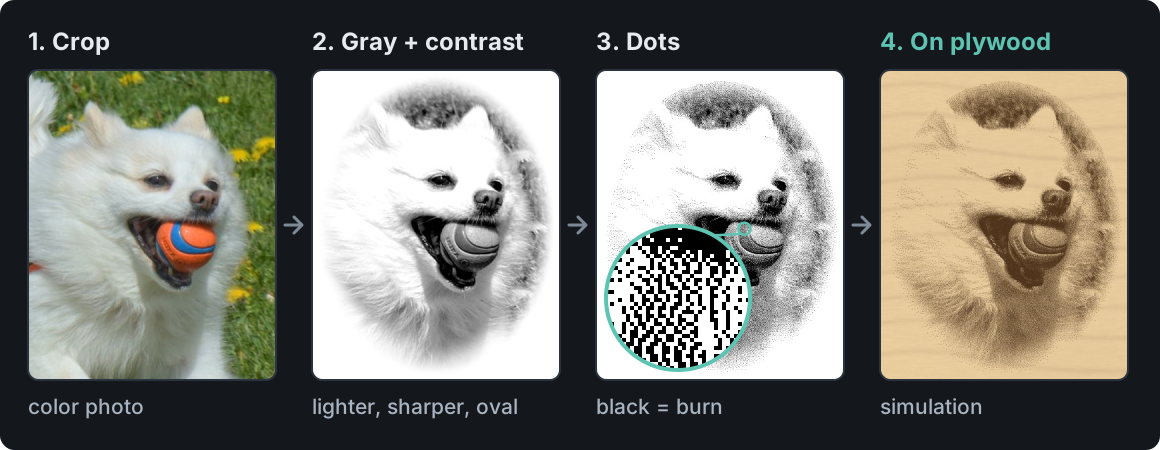
- Grayscale and levels. Convert to grayscale and stretch the range: the darkest point should be black, the lightest white. That alone often does half the job.
- Gamma (midtones). Lighten the midtones without touching black and white — this offsets the dot merging. In image editors it’s the gamma slider or the middle Levels slider; a test burn on your wood tells you how far to go.
- Contrast. Wood has a shorter tonal range than paper, so a little extra contrast helps separate fur, hair and background.
- Sharpening. Engraving always softens the image. Moderate sharpening (unsharp mask) brings back eyelashes, fur and edges.
Order matters: tones first, then sharpening, dots last. And one rule: don’t resize the image after it has been converted to dots.
Why dots instead of shades of gray
Wood doesn’t darken in proportion to laser power. At low power almost nothing happens; past a threshold the color jumps quickly to dark brown, and harder and softer growth rings burn differently. Send a grayscale photo straight to the laser and the light areas usually vanish while the dark ones merge into blotches.
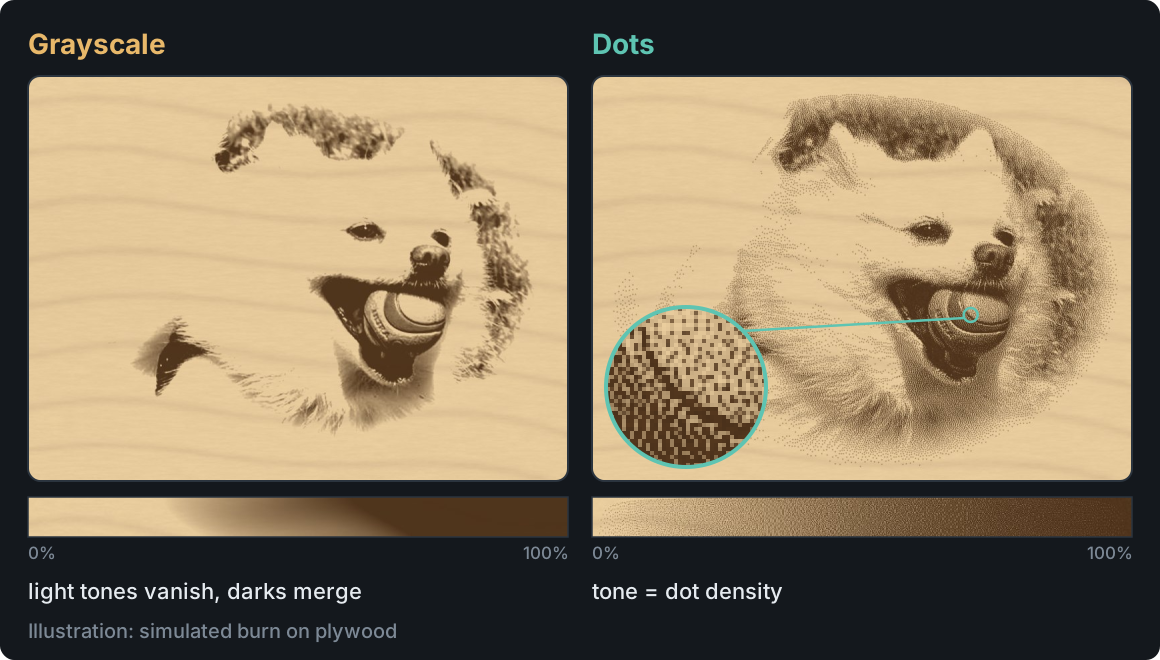
The fix comes from newspaper printing: dithering. Each dot is either fully burned or not at all, and the tone comes from their density — sparse dots in light areas, dense in dark ones. From a normal viewing distance the eye blends them into halftones. LightBurn offers several such modes (including Jarvis, Stucki, Atkinson, Dither and Halftone). For photos on wood, Jarvis and Stucki are often the favorites, but compare them on a test piece.
Grayscale mode isn’t bad — it’s the tool for 3D (depth) engraving, and some machines with good power control handle it well. For a regular photo on wood, dots are simply more predictable.
If you dither in another program, load the file into LightBurn in Pass-Through mode and set the same DPI the image was prepared at. Otherwise LightBurn resamples it to its own resolution and smears the dots.
Inverting for dark materials
On wood the laser darkens, so you burn the dark parts of the photo. On slate, anodized aluminum and black acrylic it’s the other way round: the laser mark is light. To avoid a result that looks like a film negative, invert the image before engraving — then the laser burns the light parts. In LightBurn that’s the “Negative Image” option.
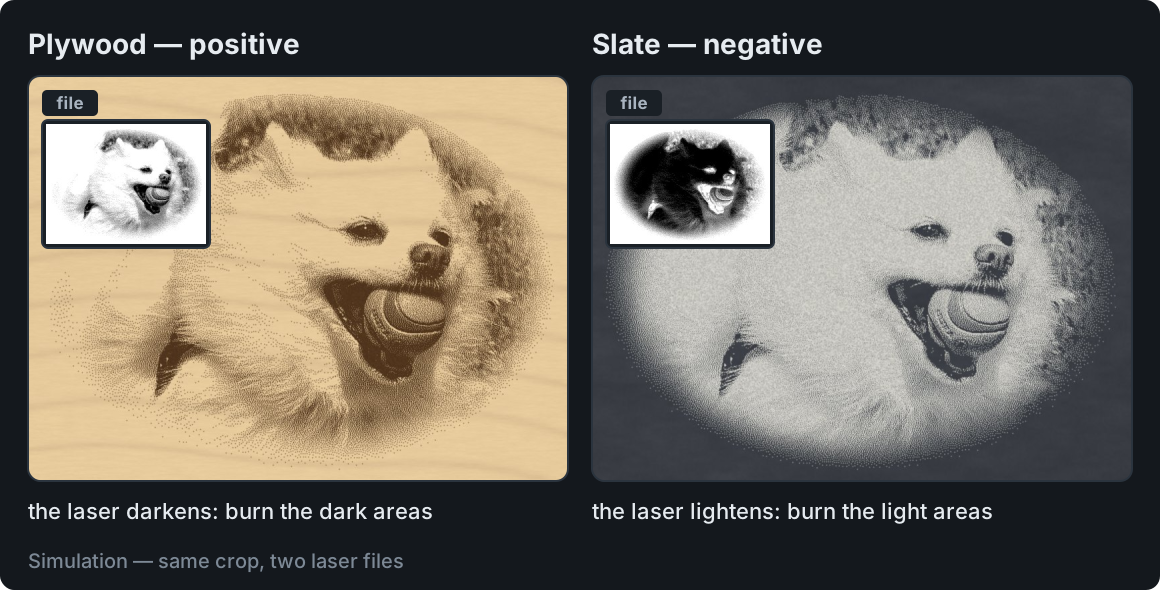
The white dog from the example actually looks better on slate than on wood: its fur becomes light dots on dark stone, just like in the photo.
Best materials for photo engraving
| Material | How the photo comes out | Tip |
|---|---|---|
| Maple, Baltic birch, alder, basswood | the best contrast among woods | 254–318 DPI, lift the midtones more |
| MDF | even, no grain, holds fine dots well | brown mark, moderate contrast |
| Dark wood (walnut, oak) | low contrast, grain gets in the way | better avoided; if you must — lower DPI and a lighter image |
| Veg-tan leather | warm, dark mark | burns easily — lower DPI and power |
| Slate | light gray mark on dark stone | inverted; striking and forgiving |
| Anodized aluminum | light, very fine mark | inverted, higher DPI |
| Black acrylic | matte, light mark | inverted; usually a CO₂ laser |
The whole prep in one place
Every step above comes together in the Photos for engraving module of the Laser MTS toolkit. You crop in millimeters (rectangle, circle or oval, with a soft edge and a cut outline), pick your material from a list or fine-tune the adjustments with sliders, compare several dot styles, and see how the photo will look on plywood, slate or leather before you burn it — taking your laser’s spot size into account. Short on pixels? Enlarge the crop with AI without leaving the module. You get a PNG with the DPI saved in the file, or a ready LightBurn project.
Do a test burn first
Before burning the whole photo, engrave a strip with the most important part — usually the eyes — on a scrap of the same material. Pick settings with a power × speed grid (see Laser material test): you want the field where a single dot is dark but doesn’t bleed yet.
Estimate the time too. Example: a 4 × 6 in portrait at 254 DPI is 1524 lines, each 4 in (101.6 mm) long. At 300 mm/s (about 12 in/s) the line travel alone takes about 8.5 minutes; at 100 mm/s, about 26 minutes. Overscan and turnarounds come on top.
Frequently asked questions
What DPI should I use to laser engrave photos on wood?
Usually 254–318 DPI (a 0.10–0.08 mm line interval). Higher DPI only makes sense with a small spot — otherwise the dots merge into a dark mass and the job takes longer.
Why does my photo engraving come out too dark?
Because the dots merge and the wood around them darkens as well. Lift the midtones (gamma), lower the power or raise the speed, or widen the line interval. Check on a test piece before the full photo.
Can a diode laser engrave photos?
Yes. Diode lasers usually have a small spot and do beautiful photo engravings on wood. They’re just slower than CO₂ lasers, so large photos take longer.
What LightBurn image mode is best for photos?
On wood, start with Jarvis or Stucki and compare them on a test piece. If the image was already dithered in another program, use Pass-Through with the same DPI as the file. Save Grayscale for 3D engraving.
What is the best wood for photo engraving?
Light and even: maple, Baltic birch, alder, basswood. Pine and oak have grain that shows through the photo, and on walnut the engraving is barely visible.