 Laser MTS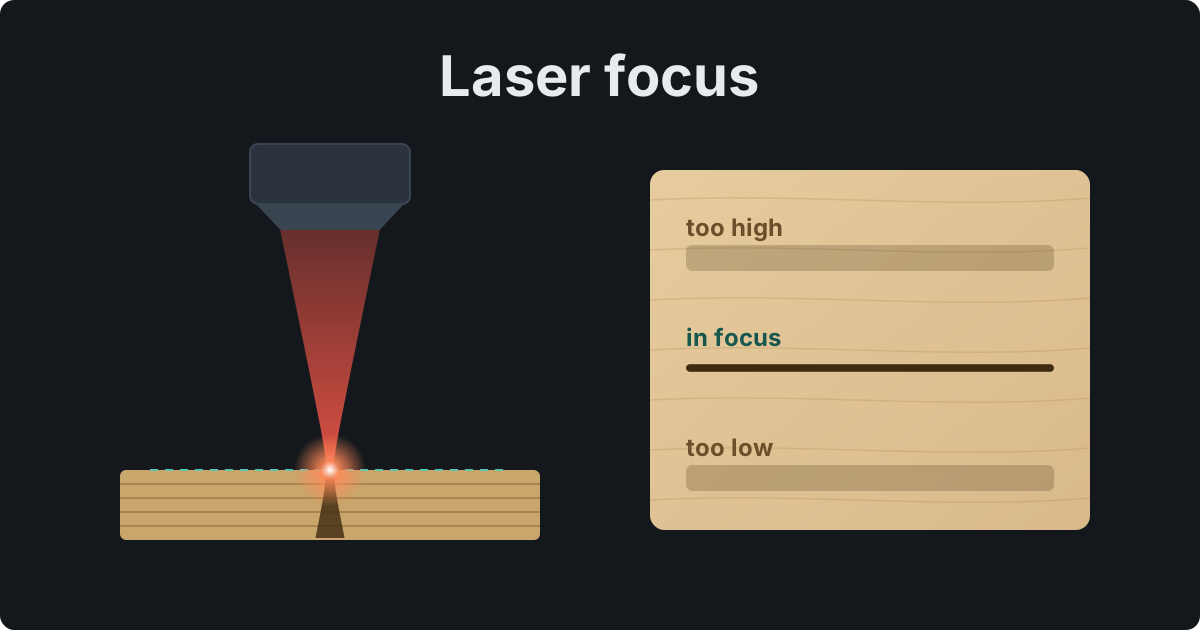
The short version
- The lens focuses the beam into a spot about 0.1–0.25 mm (0.004–0.01 in) across. Just 3 mm from focus, the spot from a standard 2″ lens is about 3.4× wider and energy density drops more than tenfold.
- Signs of bad focus: a wider kerf and loose joints, blurry engraving, a slanted edge, cuts that don't go through on part of the sheet. A dirty lens causes the same symptoms — see laser cutter maintenance.
- A short lens (1.5″) gives a tiny spot for fine engraving; a long one (2.5–4″) gives more depth of focus for thick stock. 2″ is the standard.
- Set focus with a gauge or autofocus, then verify it with a ramp test: one line on a tilted strip tells you exactly how far to move the head.
What the focal point is — and why a millimeter matters
The beam reaches the head as a column a few millimeters wide. The lens squeezes it into a cone that narrows to the smallest spot — the focal point — and then spreads out again. The distance from the lens to that point is the focal length. It decides how small the spot gets and how quickly the beam widens above and below it.
Energy density depends on the spot's area, and area grows with the square of the diameter. A spot 3× wider delivers 9× less energy per square millimeter, and one 3.4× wider (3 mm from focus with a 2″ lens) about 12× less. That's why a focus that's a few millimeters off acts like a big power cut — except your settings still look right, so you go hunting for the problem somewhere else.
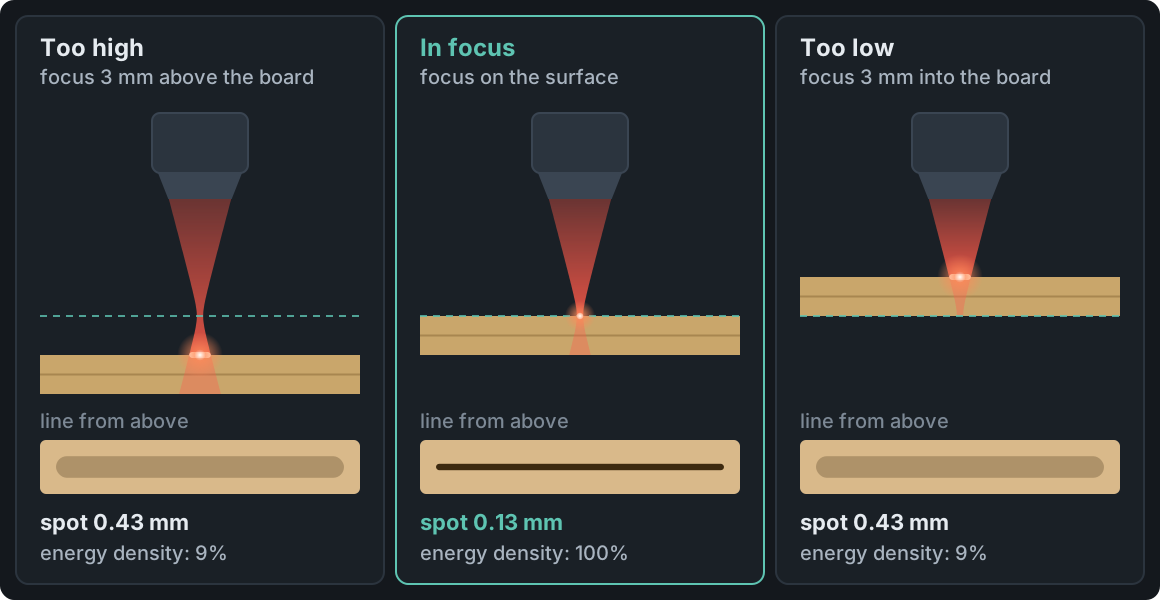
Even 1 mm matters: with a 2″ lens the spot grows to about 0.19 mm and energy density drops by roughly half. That's the “it cut fine yesterday” effect when a sheet is slightly thicker or slightly bowed.
Signs your laser is out of focus
| Symptom | What's happening | Check first |
|---|---|---|
| Wider kerf, loose joints | the spot on the surface is wider than usual | head height (focus gauge), material thickness entered in the software |
| Blurry engraving | small text runs together, edges look soft | focus; on curved objects, a longer lens |
| Suddenly won't cut through | the same power spreads over a bigger spot | focus, then clean the lens and mirrors |
| Cuts only in places | the sheet is bowed or the bed isn't level | height at several points on the sheet |
| Slanted (V-shaped) edge | the beam widens a lot through the material | focus lower, a longer lens |
| Heavily charred edges | weaker cut → slower speed → more heat | focus and air assist |
A dirty lens, misaligned mirrors (on a CO₂ laser) and an aging tube cause similar symptoms. Still, check focus first — it's the fastest fix, one minute with the gauge. If scorched edges are your main problem, see also How to prevent laser burn marks.
1.5″, 2″, 2.5″ and 4″ lenses
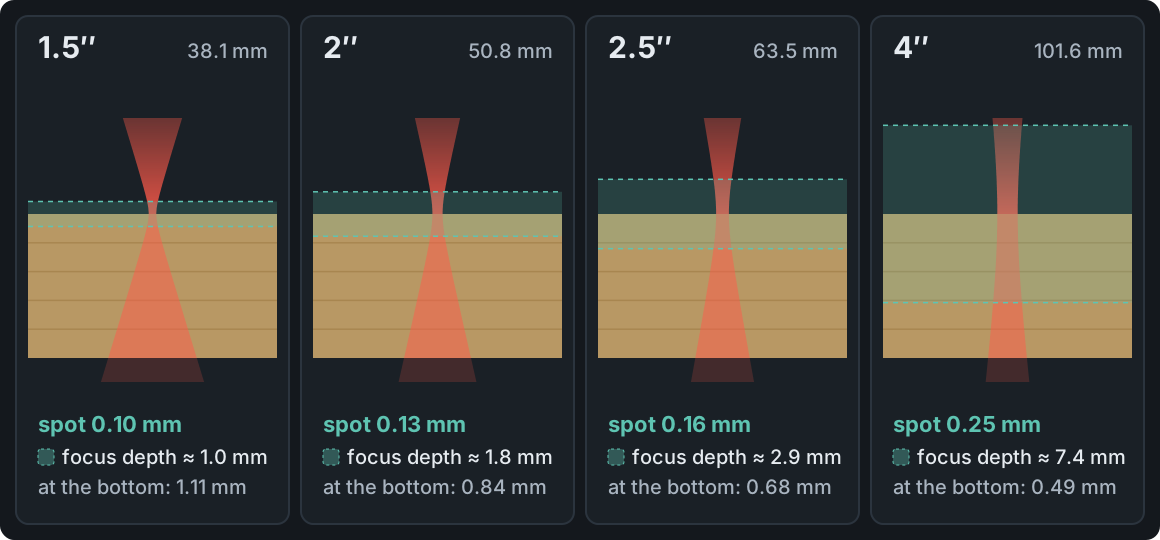
CO₂ laser lenses are sold by focal length in inches. The shorter the lens, the smaller the spot — but the faster the beam spreads out beyond the focal point, so the smaller the depth of focus: the height range in which the spot stays almost as small as at the focal point itself.
| Lens | Spot | Depth of focus | Best for |
|---|---|---|---|
| 1.5″ (38.1 mm) | ~0.10 mm | ~1 mm | fine engraving, photos, thin stock up to about 1/8″ |
| 2″ (50.8 mm) | ~0.13 mm | ~2 mm | the all-rounder: engraving and cutting up to about 1/4″ |
| 2.5″ (63.5 mm) | ~0.16 mm | ~3 mm | cutting 1/4–3/8″, slightly uneven sheets |
| 4″ (101.6 mm) | ~0.25 mm | ~7 mm | thick stock, engraving curved or recessed objects; fine detail is softer |
The numbers are calculated for a typical glass tube (a beam about 7 mm wide at the lens), with depth of focus defined as the range where the spot is at most ~1.4× its minimum width. Your machine may differ — a wider beam at the lens gives a smaller spot. The kerf is usually wider than the spot itself: in plywood it's typically 0.15–0.3 mm.
Two practical notes. When you swap lenses, the nozzle-to-material distance changes, so your old focus gauge no longer fits. And a plano-convex lens goes in curved side up, facing the incoming beam — flipped over after cleaning, it gives a noticeably bigger spot.
On a diode laser the lens is part of the module and usually isn't swapped — you only set the module's distance from the material. Diode modules have a short depth of focus, so on thicker stock it pays even more to cut in several passes, lowering the focus as you go. More on how the two machine types differ: CO₂ vs diode laser.
How to focus a laser, step by step
Focus gauge (focus block)
- Lay the material flat on the bed and move the head over the spot where the first cut will be.
- Loosen the screw on the lens tube (on a diode laser, the module's height lock).
- Slide the gauge between the nozzle and the material and lower the lens tube until the gauge touches both. On machines with a motorized Z table, raise the bed instead.
- Tighten the screw and remove the gauge — before you start the job, never during it.
A focus gauge only fits your own head and lens — don't borrow one from another machine. If the ramp test (below) shows the focus is off, correct the gauge once and for all, for example by sticking on a thin shim or shortening it by the measured amount.
Autofocus
A sensor — a mechanical probe or an optical measurement — reads the surface height and sets the head for you. Handy, but it has its traps:
- a probe must not land in a honeycomb cell or a hole you've already cut;
- optical sensors can be fooled by clear acrylic and mirror-like surfaces;
- it measures a single point, so it won't “flatten” a bowed sheet.
If you set focus by entering material thickness (motorized Z table), enter the thickness you measured with calipers. “1/8-inch” plywood is often anywhere from 2.7 to 3.2 mm — more on that in Best plywood for laser cutting. Check your autofocus against a ramp test every now and then, too.
The ramp test — the most accurate check
A gauge and autofocus set the focus where it should be. A ramp shows where it actually is. Lay a strip of material at an angle — one end on a spacer, the other on the bed — and set focus at the middle of the strip. The laser draws a straight line along it. Where the surface crosses the real focal point, the line is thinnest and darkest.
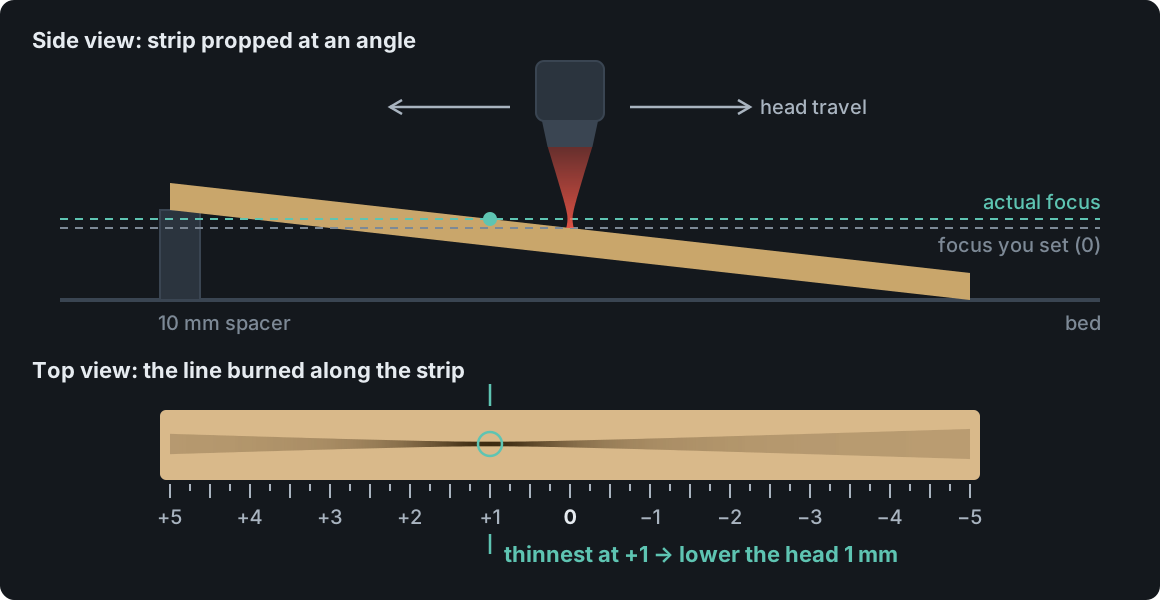
With a 200 mm (8 in) strip raised 10 mm at one end, every 20 mm along the strip equals 1 mm of height, so the scale reads from +5 to −5 mm. The thinnest line at +1 means the real focal point is 1 mm higher than where you set it — lower the head (or raise the bed) by 1 mm. At −1, do the opposite. The test takes two minutes and pays off on every job after it.
You can generate a ramp file with a ready scale in the free Laser MTS Material tests: enter the line length and how high one end is raised, and you get a LightBurn project (or SVG) with a labeled scale and the test line's power already set — with the option to cut out the strip as well. After burning it, enter the number you read, and the tool tells you which way and how far to move the head. Reading the scale with an example, and the other tests in the same tool step by step, are covered in How to measure laser kerf — material tests step by step.
Focus on the surface or inside the material?
- Engraving and scoring — focus on the surface. Some people defocus 1–2 mm on purpose to get smoother fills on large areas — but that's a deliberate choice, not an accident.
- Cutting thin stock (up to about 5/32″ / 4 mm) — on the surface or about 1 mm below it.
- Cutting thick stock (1/4″ / 6 mm and up) — usually about a third of the thickness below the surface, e.g. 2 mm into a 6 mm board. The beam is then narrower in the lower part of the kerf, the edge is straighter and the bottom cuts through more cleanly. Manufacturers recommend the same for thick acrylic: about a third of the way down (e.g. 2 mm into 6 mm) — see Laser cutting acrylic.
- Multiple passes — if your machine has a Z table, the software can lower the focus after each pass so the next one works at the bottom of the kerf.
These are starting points, not rules — two or three test cuts at different offsets will show what works for your lens and material.
Warped plywood: focus that “wanders”
A 24 × 16 in (600 × 400 mm) sheet bowed by 2–3 mm is a common sight, especially after a change in humidity. With a 2″ lens and a depth of focus of about 2 mm, that's enough for the corners to cut and the middle not to. What helps:
- Honeycomb pins — pushed into the bed cells, they hold down the edges and the middle of the sheet.
- Magnets — if your bed is steel.
- Weights on the edges — flat, heavy offcuts or strips of wood.
- Masking tape holding the edges to the bed frame — for slight bows.
- Smaller blanks — bow grows with length, so a sheet cut in half usually lies flat.
Keep everything that holds the sheet down outside the head's path and away from cut lines — the nozzle must not catch on anything, and the beam shouldn't hit metal. If a slight bow remains, set focus halfway between the lowest and highest point of the sheet, or switch to a longer lens that's more forgiving. Store sheets flat, in a dry place, under light weight.
Frequently asked questions
How do I focus a CO₂ laser?
Slide the focus gauge between the nozzle and the material, lower the lens tube (or raise the bed) until it touches, and tighten — or let autofocus do it. Verify with a ramp test now and then.
How do I know if my laser is in focus?
Run a ramp test: the line burned along a tilted strip is thinnest at the real focal point, and the scale shows how far to move the head.
What lens should I use to cut 1/4 inch plywood?
A standard 2″ lens works; a 2.5″ lens gives a straighter edge and more margin on bowed sheets. A 1.5″ lens is a poor fit — the beam spreads too fast through the board.
Should the focus be on the surface or in the middle of the material?
On the surface for engraving and thin stock; about a third of the way down for 1/4″ and thicker, and the same for thick acrylic (about a third). Confirm with a quick test.
Why won't my laser cut through in the middle of the sheet?
Usually the sheet is bowed or the bed isn't level, so the middle falls outside the depth of focus. Pin or weigh the sheet down and check the height at several points.