 Laser MTS
In short
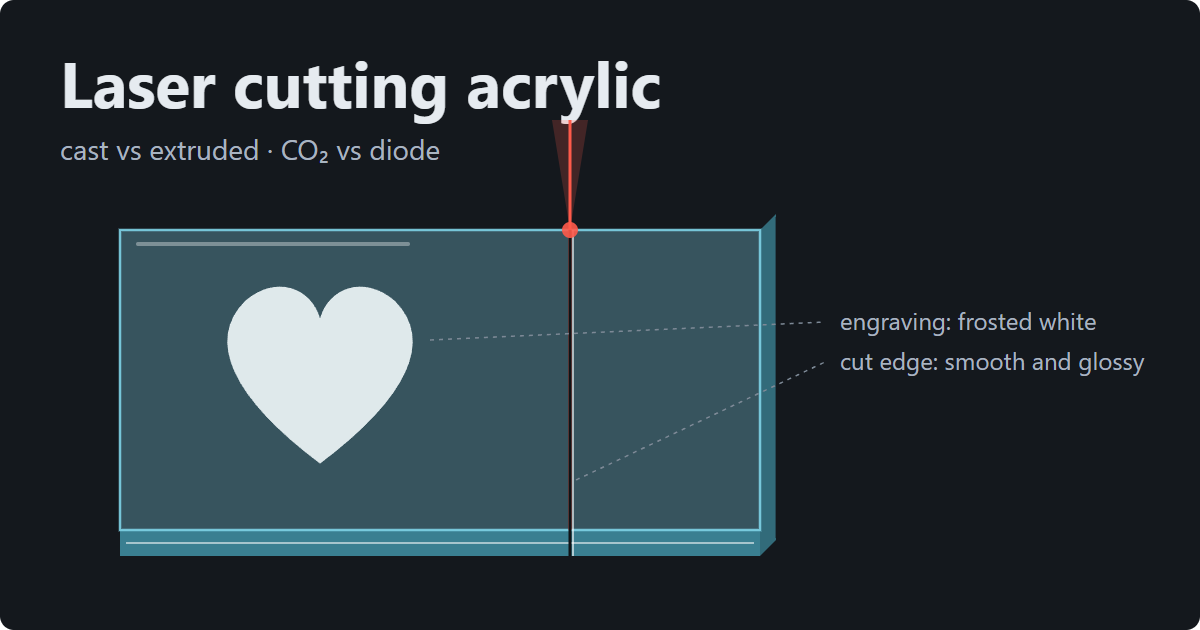
- Cast acrylic (Röhm’s “GS”) engraves frosted white; extruded (“XT”) cuts with a glossy, flame-polished edge but engraves nearly clear. Choose cast for text and logos, extruded for press-fit parts.
- Thickness tolerance of a 1/8″ (3 mm) cast sheet is ±0.7 mm; extruded is ±0.15 mm (maker’s data for PLEXIGLAS®). For press-fit joints that’s a world of difference.
- A CO₂ laser cuts every acrylic, clear included. A diode (around 450 nm) passes straight through clear and light-colored sheet — it only cuts dark, opaque acrylic, slowly and without the glossy edge.
- Starting point on CO₂: about 10 W of laser power per 1 mm of thickness, gentle air assist, and for 1/4″ and thicker, focus down into the sheet. Too slow means flames; never leave it unattended.
- A laser-cut edge is stressed: alcohol, glass cleaner and solvent cement turn it into a web of cracks. Wash with dish soap and water; anneal parts before cementing.
Cast or extruded — the first decision
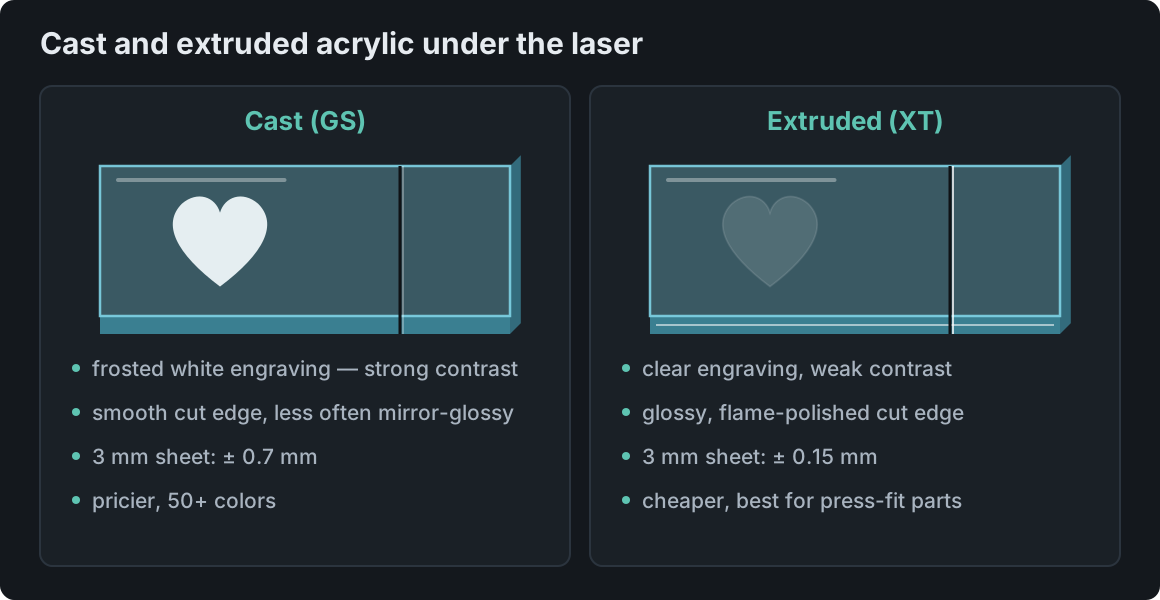
Chemically it’s the same polymethyl methacrylate. The difference is how it’s made: cast sheet is poured between glass plates, extruded sheet is pushed through a die like pasta. For the laser that means three differences you’ll see on every part.
| Property | Cast (GS) | Extruded (XT) |
|---|---|---|
| Engraving | frosted white, strong contrast — logos, text, photos | clear, grayish, weak contrast |
| Cut edge | smooth, but not always mirror-glossy | glossy, “flame-polished” straight off the laser |
| 1/8″ (3 mm) thickness | ±0.7 mm | ±0.15 mm |
| Softening point | higher (Vicat about 115 °C / 239 °F) | lower (about 103 °C / 217 °F) — melts sooner, gums up tools |
| Solvent cracking | more resistant | more prone to crazing after laser cutting |
| Price and colors | pricier, 50+ colors from the big makers | cheaper, fewer colors |
How do you tell what you’ve got? With Röhm (Plexiglas) the grade code settles it: four digits means GS, five means XT. Without a label, the surest check is a test: engrave a 10 × 10 mm square on an offcut — frosted white is cast, clear is extruded. Price is a hint too: cast costs noticeably more.
Thickness tolerance — why it matters
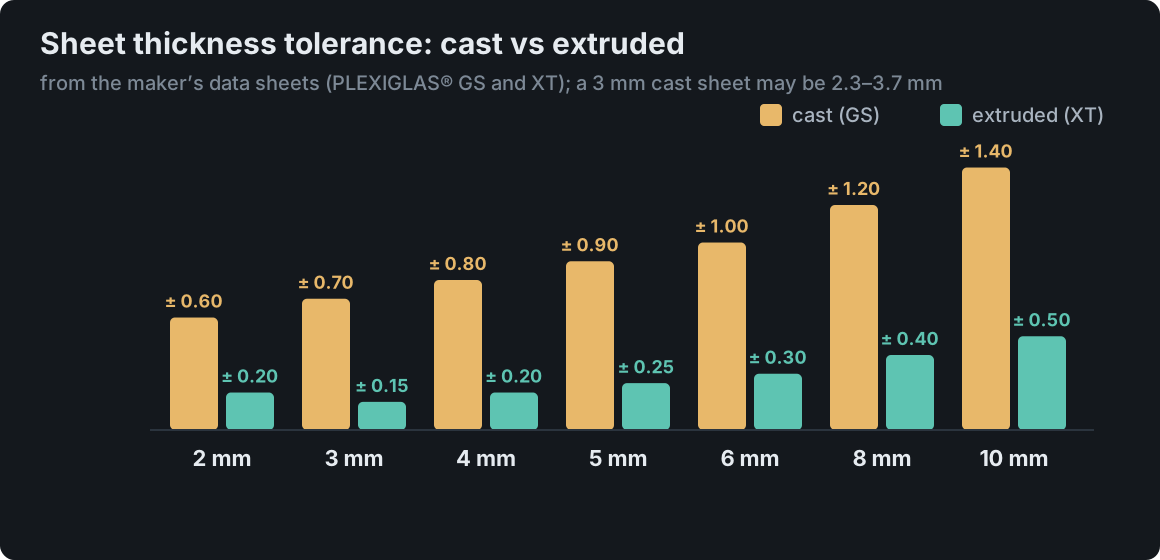
A cast “1/8″” sheet can legitimately be anywhere from 2.3 to 3.7 mm. Design a 3.0 mm press-fit slot and one batch will rattle while the next won’t go in. That’s why makers and suppliers point you to extruded sheet for boxes, dividers and anything that has to snap together — and you still measure every batch with calipers in a few spots and put the measured thickness into the design, not the nominal one.
CO₂ cuts everything, a diode only dark sheet
A CO₂ laser (10.6 µm) is absorbed by every acrylic — clear, colored, mirrored — and it is the best tool for this material. A diode emits blue light at about 450 nm, and clear sheet is transparent to it: the beam goes through the acrylic and scorches the bed underneath. Why that happens is explained in our CO₂ vs diode laser guide.
- A diode only cuts dark, opaque acrylic — black, dark red, dark green. In xTool’s settings table, 3 mm black acrylic cuts on a 40 W module at 100% and 5 mm/s in one pass; dark red on a 20 W module at 3 mm/s in three passes. The edge is matte, not glossy.
- Blue and light-colored acrylic is almost as “invisible” to a diode as clear sheet.
- Painting clear sheet black or taping it so the diode has something to grab is a trick for 1 mm of film, not for 1/8″ sheet: diode makers themselves say that beyond 1–2 mm you get smoke, melted edges and frustration. If you want to cut clear acrylic, you need a CO₂.
Cutting settings — a starting point
Trotec gives a simple rule: for a clean cut with a polished edge you want about 10 W of laser power per millimeter of thickness. So 40 W is comfortable up to 1/8″–5/32″ (3–4 mm), 60 W up to about 1/4″ (6 mm), 100 W up to 3/8″ (10 mm) — thicker sheet can be cut, but slowly and with a worse edge. The ranges below are gathered from makers’ published tables (Trotec, Epilog, Thunder Laser) — as always, a starting point for a test, not numbers to run.
| CO₂ laser | Acrylic 3 mm (1/8″) | Acrylic 5 mm (3/16″) | Acrylic 8 mm (5/16″) |
|---|---|---|---|
| 40 W | 100%, 4–8 mm/s | 100%, 2–4 mm/s | 100%, 1–2 mm/s (maybe 2 passes) |
| 60 W | 80–100%, 8–14 mm/s | 100%, 4–7 mm/s | 100%, 2–4 mm/s |
| 100 W | 70–90%, 15–25 mm/s | 90%, 8–14 mm/s | 90–100%, 4–7 mm/s |
For comparison, from makers’ tables: Thunder Laser lists for a 100 W machine 2.5 mm at 40 mm/s, 5 mm at 18 mm/s and 10 mm at 5 mm/s (all at 90%); Epilog’s 60 W cuts 1/8″ acrylic at 8% of top speed and 1/4″ at 4%. Beyond power and speed:
- Gentle air assist. The opposite of wood — strong air cools the edge and makes it dull. Trotec recommends no more than about 0.2 bar (3 psi) for a polished edge; some makers say to turn air off entirely, but then you stand at the machine, because acrylic likes to burn. A sensible compromise: just enough air that there’s no flame.
- One pass, not several. A second pass doesn’t give a nice edge — if it doesn’t cut through, slow down or move to a more powerful laser (Trotec advises against multi-pass cutting of acrylic).
- Pulse frequency, if your laser sets it: higher gives a smoother edge in transparent materials; Trotec lists 5,000–20,000 Hz for cast and up to 5,000 Hz for extruded.
- Focus. On the surface up to 3/16″ (5 mm). From about 1/4″ (6 mm), focus down into the sheet — Trotec suggests one third of the thickness, Epilog about 2 mm (0.080″) closer to the lens than standard — for a straighter edge. For thick sheet use a 2.5″ lens instead of 2″. More in our laser focus guide.
- Too slow = fire. Cutting slower doesn’t improve the edge, it ignites the material. If a flame doesn’t go out, stop the job.
Two test grids on an offcut of acrylic settle it: a power × speed grid in cut mode and a focus ramp (focus drifts matter more in acrylic than in wood, because every tenth of a millimeter shows in a straight edge). The free Laser MTS Material Tests build both as a ready LightBurn file — every grid square on its own layer with its own settings — and the focus ramp opens directly. How to read the result is in our guide to the laser material test.
Masking: paper or film, peel or leave
Acrylic ships protected by masking — paper (more common on cast) or polyethylene film (more common on extruded). The rules:
- Cutting: masking can stay on both sides. The bottom layer also protects against flashback marks from the bed (more below), the top layer against smoke settling on the sheet.
- Engraving: peel the top masking. Paper engraved together with the sheet leaves paper and adhesive residue in the engraving (Epilog warns about this outright), and PE film melts and fuses into the edges of the engraved area.
- Reverse engraving (burning away the background around letters) on dark acrylic — also without masking.
- Peel masking off finished parts from a corner; after months in storage paper masking can crumble — soaking in warm water helps, solvent doesn’t.
Flashback marks: honeycomb vs pins
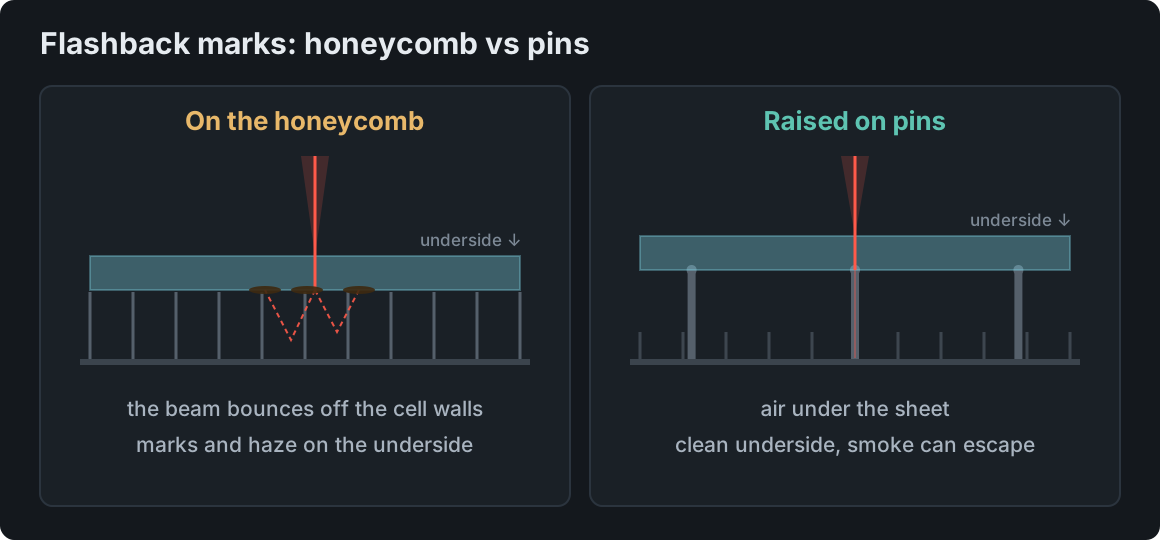
On plywood, scorching on the underside hides in the color of the wood. On clear acrylic every trace of the reflected beam shows like through a window. The beam that has passed through the sheet hits the walls of the honeycomb cells, bounces and comes back into the underside of the material — you get milky dots and streaks along the cut line, and smoke trapped in the cell settles on the bottom. Fixes, simplest first:
- Leave the bottom masking on — the flashback lands on the masking, not the sheet.
- Raise the sheet on pins, strips or a knife-blade table — there should be air under it, not metal; the beam has nothing to bounce off and the smoke has somewhere to go. For 1/4″ and thicker, Trotec recommends a slat table with acrylic slats.
- Masking tape on the underside where you can’t raise the sheet.
The laser-cut edge: stress, cracks, flame polishing
A laser cuts acrylic by vaporizing it — the edge is smooth, but it holds a lot of stress from rapid heating and cooling. The makers (Röhm, Acrylite) say it plainly: after laser cutting, the sheet may need annealing (stress relief) to avoid crazing — a web of fine cracks that appears on the edge after contact with a solvent, sometimes weeks later. The fastest way to cause it yourself:
- isopropyl alcohol or glass cleaner used to “clean up” a part — within minutes the edge is white and cracked;
- solvent cement applied to a freshly cut edge, especially on extruded acrylic;
- acetone, lacquer thinner, gasoline — never.
Wash acrylic with dish soap, water and a soft cloth — that’s all the maker of Plexiglas recommends. Before cementing, it’s worth annealing laser-cut parts in a convection oven at about 80 °C (175 °F) — the time depends on thickness, tens of minutes for thin sheet and hours for thick; check your sheet’s data sheet — and cooling them slowly. Cast acrylic is far more resistant to cracking than extruded.
Flame polishing of saw-cut edges is standard in sign shops, but the Plexiglas fabrication manual stops short of recommending it precisely because of crazing — and never when the part will later be cemented, painted or formed. After a laser the edge is usually smooth enough anyway; if you do polish, use a quick torch pass without stopping and without quenching in water.
Gluing acrylic — safely
- Solvent cements (Weld-On, Acrifix 1S) dissolve both surfaces and weld them into one. The classic ones (Weld-On 3, 4) are 75–90% methylene chloride — per the safety data sheet: suspected of causing cancer, vapors heavier than air, dangerous concentrations in a poorly ventilated room. Newer ones (Acrifix 1S 0116) are methylene-chloride-free but highly flammable instead.
- Polymerizing (reactive) adhesives (e.g. Acrifix 1R 0192) give a strong, clear joint and the maker recommends them for cast acrylic.
- Whatever you use: ventilation, gloves rated for that solvent (per the SDS), eye protection, parts that fit without forcing, edges dry and clean — and annealed if they were laser cut.
- For small parts with no optical requirements, CA glue or two-part epoxy will do; both bloom white when you use too much.
Fumes, fire and look-alikes: polycarbonate and PVC
- Acrylic fumes are mostly monomer (methyl methacrylate) — a sharp smell that irritates eyes and airways. An exhaust vented outside or an activated-carbon filter is a necessity, not an extra. Exhaust rules and laser classes are in our guide to laser cutter safety.
- Acrylic burns readily — the maker compares it to hardwood. Never leave the machine unattended while cutting acrylic; every laser maker repeats this in its guides.
- Polycarbonate (PC) looks like acrylic, but under a CO₂ laser it yellows and browns at the edge, smokes and leaves a sticky residue. Epilog concedes that thin sheets can be cut, but with discoloration — it’s no good for anything that has to look nice.
- PVC and “vinyl” film don’t go in a laser at all: the chlorine in the fumes wrecks the machine and your lungs.
- How to tell them apart: acrylic snaps with a crack when bent, polycarbonate bends. With an unlabeled sheet, ask the supplier for the material name (PMMA) — don’t cut a sheet of unknown composition.
What acrylic is for in a laser shop
Signs and plaques (cast, reverse-engraved on colored sheet), keychains and tags with a glossy edge (extruded), edge-lit LED signs where the edge glows (clear, cast if you need to engrave it), awards and trophies, lids and windows for plywood boxes, clock faces, templates and gauges (how the laser behaves on glass, leather, slate or metal is covered in our guide to laser engraving other materials). One design trap: in acrylic, fine details narrower than the kerf and bridges thinner than about 1 mm (0.04″) simply melt together, and open contours leave a groove in the sheet instead of a hole — check the file before you cut.
Frequently asked questions
Can a diode laser cut acrylic?
Only dark, opaque and preferably thin sheet — e.g. 1/8″ black on a 40 W module in one pass, on 20 W in several. Clear, blue and light-colored acrylic won’t cut on a diode, because blue light passes straight through it. For clear acrylic you need a CO₂ laser.
Which acrylic is best for laser engraving — cast or extruded?
Cast: the engraving comes out frosted white with strong contrast. On extruded sheet the engraving is clear and nearly invisible. Use extruded where a glossy edge and exact thickness matter — for press-fit parts.
Why does acrylic crack after gluing or cleaning?
Because a laser-cut edge is stressed, and a solvent — alcohol, glass cleaner, cement — opens a web of fine cracks in it (crazing). Wash with dish soap and water, anneal parts at about 80 °C (175 °F) before cementing, and avoid extruded acrylic where it will be glued.
Should I remove the masking from acrylic before laser cutting?
For cutting, no — the masking protects the surface and the underside from flashback. For engraving, peel the top layer: paper leaves adhesive in the engraving, PE film melts.
How many watts do I need to cut acrylic?
Roughly 10 W per millimeter of thickness: 40 W comfortably cuts 1/8″–5/32″, 60 W up to 1/4″, 100 W up to 3/8″. Thicker sheet can be cut more slowly, but edge quality suffers.