 Laser MTS
In short
- Starting point for 1/8″ (3 mm) Baltic birch: 60 W CO₂ — 60–80% power at 12–25 mm/s in one pass; 10 W diode — 100% at 3–5 mm/s (180–300 mm/min) in 1–2 passes. Full chart below.
- Twice the thickness is roughly half the speed: in one CO₂ maker’s chart, 1/8″ wood cuts at 8% of top speed and 1/4″ at 4%.
- Nobody’s chart transfers 1:1, because glue, moisture and species on the sheet side and real tube power, lens and focus on the laser side decide the result. The same 60 W laser cuts alder five times faster than oak.
- You find your settings with a power × speed grid in cut mode on an offcut of the same sheet — about 15 minutes. Pick the fastest square that drops out clean.
- Save settings per laser and per material, with the thickness measured by calipers — or you’ll run the test again next month.
Starting-point chart
The ranges below come from laser makers’ published settings (xTool, Trotec, Epilog, Thunder Laser) and from our own cuts in birch and poplar plywood. They are a starting point for a test, not settings to run: start at the fast end of each range and slow down until the parts drop out clean across the whole bed. For diode lasers we quote optical output (not the power-supply rating) at 100% power — there’s almost never a reason to cut with a diode at less.
| Laser | Plywood 3 mm (1/8″) | Plywood 4 mm (5/32″) | Plywood 6 mm (1/4″) |
|---|---|---|---|
| CO₂ 40 W | 70–100%, 8–15 mm/s, 1 pass | 80–100%, 6–10 mm/s, 1 pass | 100%, 3–5 mm/s, 1–2 passes |
| CO₂ 60 W | 60–80%, 12–25 mm/s, 1 pass | 60–80%, 10–18 mm/s, 1 pass | 70–100%, 6–10 mm/s, 1 pass |
| CO₂ 100 W | 50–70%, 25–40 mm/s, 1 pass | 60–80%, 18–30 mm/s, 1 pass | 70–90%, 10–18 mm/s, 1 pass |
| Diode 10 W | 100%, 3–5 mm/s, 1–2 passes | 100%, 2–4 mm/s, 2–3 passes | 100%, 2–3 mm/s, 3–5 passes |
| Diode 20 W | 100%, 5–8 mm/s, 1 pass | 100%, 4–6 mm/s, 1–2 passes | 100%, 3–5 mm/s, 2–3 passes |
| Diode 40 W | 100%, 10–15 mm/s, 1 pass | 100%, 8–12 mm/s, 1 pass | 100%, 6–10 mm/s, 1–2 passes |
A few notes on reading the chart:
- Units. Speeds are in mm/s. Diode laser software usually shows mm/min — multiply by 60 (5 mm/s = 300 mm/min). Getting it backwards means a cut sixty times too slow and a fire; LightBurn’s documentation warns about exactly this.
- Percent scales. Some makers (Trotec, Epilog) list speed as a percentage of the machine’s top speed, not mm/s — don’t carry those percentages into another program.
- Air assist on for every wood cut, on the strong side — it blows smoke out of the kerf and kills flames. How to set it is in our guide to preventing laser burn marks.
- Focus on the surface for 3 and 4 mm; at 6 mm also try the focus 1–2 mm (about 1/16″) down into the sheet — the kerf at the bottom gets narrower. Details in our laser focus guide.
- Poplar vs birch. Poplar ply (lighter, about 400–500 kg/m³) cuts at the fast end of the speed range, Baltic birch (about 650–700 kg/m³) at the slow end. Exterior plywood on phenolic glue can fall outside the range altogether.
Why someone else’s chart never transfers 1:1
Two “60 W” machines with the same “1/8″ plywood” can need settings that differ by a factor of two. There are a few reasons on the sheet side and a few on the laser side.
The sheet
- Glue. The laser vaporizes wood, but glue chars. A thin, pale urea (UF) glue line cuts easily; a thick, dark phenolic (PF) line in exterior plywood needs more energy and leaves more soot. Plywood sold as “laser grade” usually has a melamine-urea (MUF) glue with a colorless glue line — Metsä Wood says so outright in the data sheet of its Laser plywood. More in our guide to the best plywood for laser cutting.
- Moisture. Wood takes moisture from the air, and a damp sheet needs more energy: part of the beam goes into boiling off water. A batch that arrived in winter straight from an unheated warehouse cuts differently from the same sheet after two days in the shop. Plywood makers quote dimensions at about 10% sheet moisture — which it only reaches in a dry room.
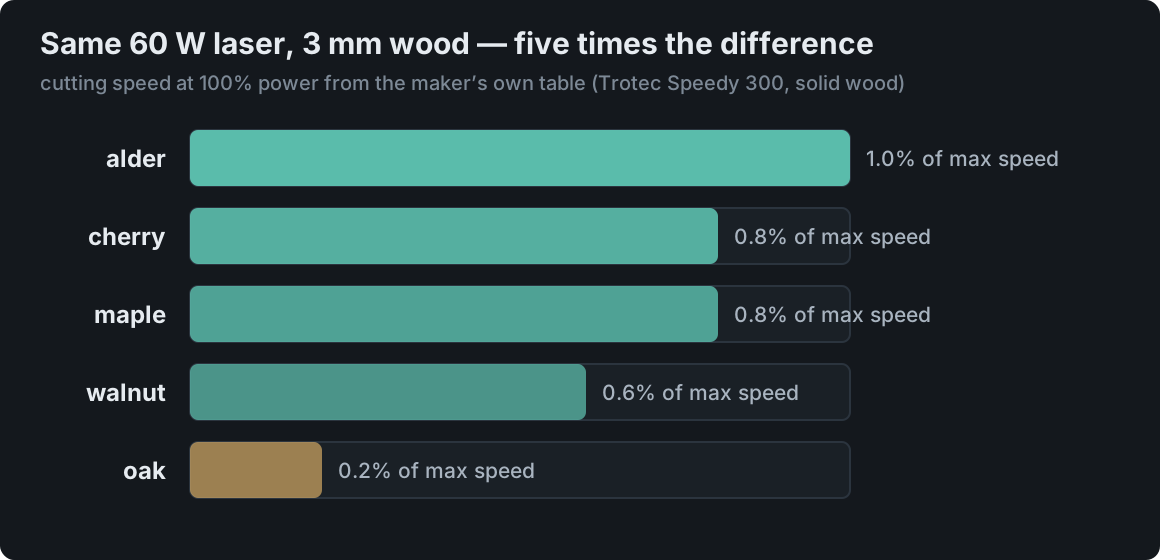
- Species and face veneer. Wood density changes speed more than anything else. In Trotec’s parameter table for the Speedy 300 60 W, 3 mm solid wood cuts at 100% power with a speed of 1% (alder), 0.8% (cherry, maple), 0.6% (walnut) and 0.2% (oak) of the machine’s top speed — a five-fold difference on the same laser. Birch plywood with a hardwood face veneer behaves the same way.
- Actual thickness. “1/8″” is 2.8–3.2 mm in practice, and the European plywood standard EN 315 allows about ±0.2–0.3 mm. A few tenths more is a few percent more energy.
The laser
- Real power. The label is not a measurement. “40 W” CO₂ tubes in the cheapest machines usually measure around 30 W in users’ hands, and every tube loses power with age and with every month of dirty optics. Diode modules labeled “10 W” or “20 W” mean optical output — unless the maker quietly quoted the power supply instead.
- Lens and focus. A 1.5″ lens gives a smaller spot and higher power density but a short depth of focus; a 2.5″ lens gives more tolerance on a warped sheet but a wider kerf and needs more power. Trotec recommends 1.5″ for wood up to 8 mm, 2″ up to 12 mm and 2.5″ up to 15 mm. A focus set 1 mm too high can cost half your speed.
- Optics and mirrors. A smoky lens means less power at the sheet; misaligned mirrors mean different power in every corner of the bed. The symptom: the far corner stops cutting through while the center cuts fine.
- Air and bed. Air assist at 7 psi and at 30 psi are two different worlds, and a honeycomb bed reflects the beam differently than a knife-blade table.
That’s why a chart tells you where to look, not what to type in.
Too slow or too fast — what the sheet shows you
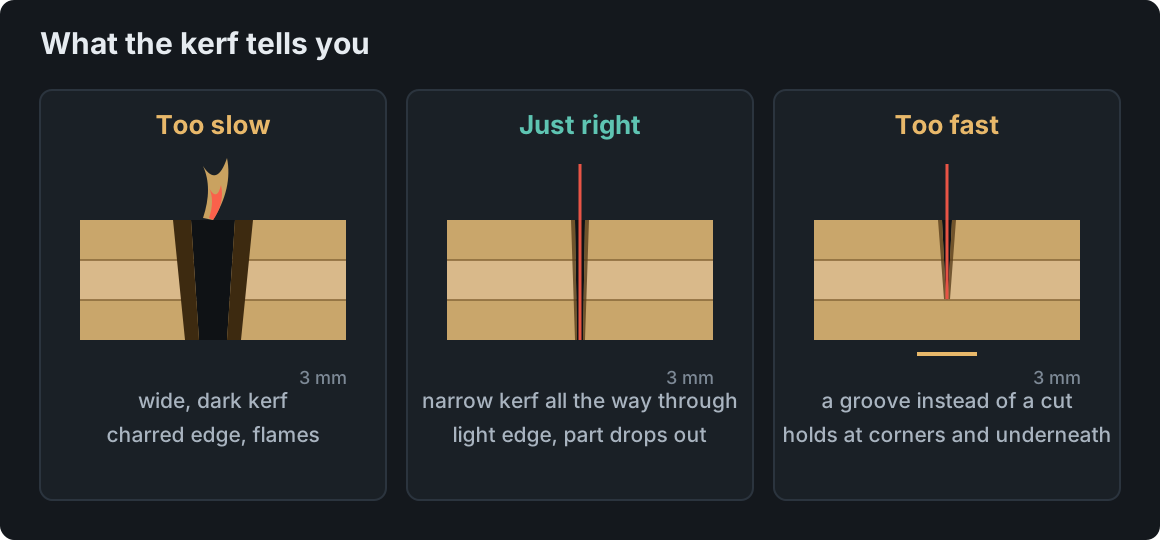
- Too slow (or too much power): a wide, dark kerf, a charred edge flared at the top, flames in the kerf, brown streaks on the underside and residue all over the sheet; on small parts, burned-through bridges. Every second “just to be safe” is more heat in the sheet.
- Too fast (or too little power): a groove or a thin skin on the underside instead of a kerf; parts hang on at the corners (the head slows down there, but not enough) and at voids or knots. A few uncut spots while the rest cuts clean usually means a flaw in the sheet, not the settings.
- Just right: a narrow kerf all the way through, a light or lightly browned edge, the part drops out on its own or with a gentle push, clean underside.
The rule that ties it together is energy per millimeter of line, which depends on the ratio of power to speed. If you’re a few percent short, slowing down 10% gets you there faster than adding power — on a CO₂ laser, running the tube above about 80% shortens its life, and a diode is usually at 100% already.
Your own settings in 15 minutes: the power × speed grid
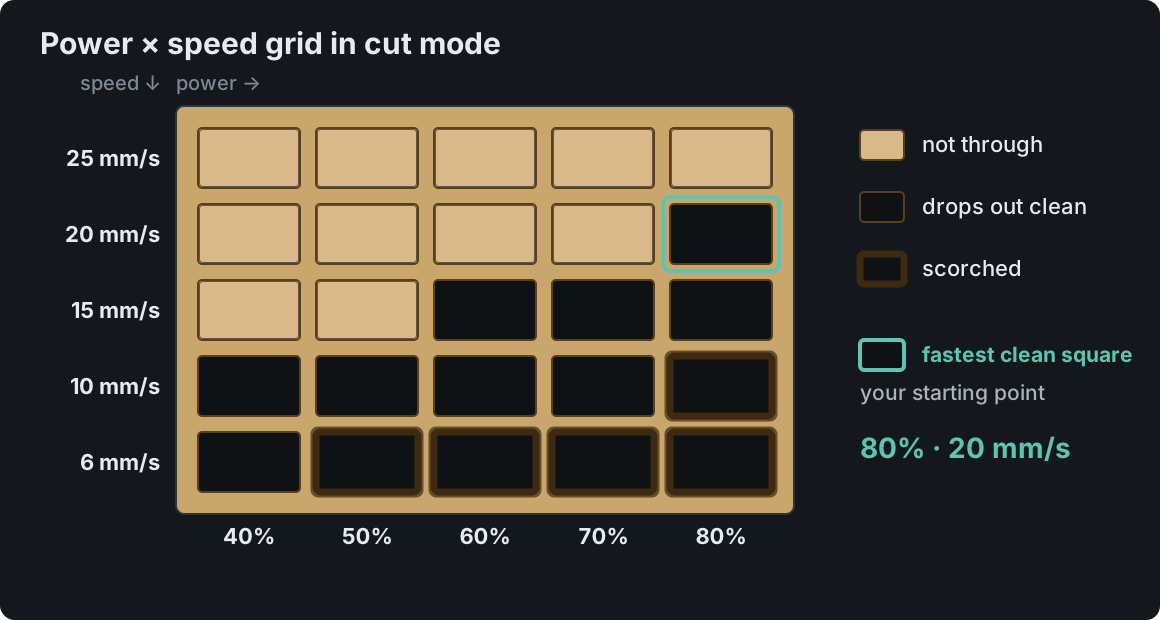
The fastest route to good settings is one test on an offcut of the same sheet: a grid of squares with power rising across the columns and speed changing down the rows, every square cut in line (cut) mode. One run shows you the whole range at once.
- An offcut of the same sheet, same side up, held flat. Focus set as you’d run the job.
- The range from the chart. For a 60 W CO₂ and 1/8″ plywood: power 50–80% in four columns, speed 8–30 mm/s in five rows. For a diode: keep power at 100% and vary only speed and passes. Squares about 10 × 10 mm (3/8″).
- Cut mode, not fill. In LightBurn, Laser Tools → Material Test builds the grid (10 × 10 by default; it can vary power, speed, interval or passes). Air assist as for the real job.
- Reading the result. Don’t force the squares out — a square you have to snap out is not cut. Pick the fastest square that drops out clean, and if several powers work at that speed, the lowest of them.
- Check a corner of the bed. Cut that one square again in the corner farthest from the tube. If it doesn’t drop out there, blame the optics or a warped sheet — not the settings.
- Save it right away, with the thickness measured by calipers.
Twenty 10 mm squares are 800 mm of cutting — under a minute of laser time at 15 mm/s; the rest of the quarter hour is setup and looking. The free Laser MTS Material Tests build this grid in “Cut” mode as a ready LightBurn file — every square sits on its own layer with its power, speed and passes already set, and the labels are engraved in a thin line next to it, so there’s nothing to count after the burn. Kerf measurement and a focus ramp come in the same tool; with an account, the result is saved to your Materials Library separately for each laser. How to read the other tests — kerf, the fit comb and the focus ramp — is shown step by step in How to measure laser kerf.
Passes, air and focus — three knobs beyond power and speed
- Number of passes. A second pass is normal for 1/4″ on a 40 W CO₂ and for every thickness on a 10 W diode. Two faster passes often give a lighter edge than one slow one, because the sheet cools in between — but every pass reheats the edge and widens the kerf. LightBurn can lower the head with each pass (Z step per pass) so the focus follows the cut; Epilog recommends the same for thick wood.
- Air assist. Strong for cutting wood, gentler for engraving. A clogged nozzle means weaker air and more scorching.
- Focus. Before you touch the settings after a break, run a focus ramp to see whether the focus has drifted — a lens change, cleaned optics or a warped sheet can move it by a millimeter.
Saving settings: per laser and per material
Most time is lost repeating the same test because the result stayed on a sticky note. A good place for settings has to tell apart the laser (a 10 W diode and a 60 W CO₂ have nothing in common), the material (birch on UF glue, exterior birch, poplar, MDF) and the measured thickness, and also remember the lens, focus and air.
- In LightBurn that’s the Material Library: entries organized as material → thickness → operation (cut, engrave), and the library is tied to the device, so switching machines loads that machine’s own library.
- On paper next to the machine: date, supplier and glue type, caliper thickness, lens, focus, air, power / speed / passes, notes (“needs 2 mm/s less in the far corner”).
- In Laser MTS you keep settings in the Materials Library — for every material, cut and engrave parameters separately for each laser you’ve set up in Settings, together with the measured thickness and kerf; the box, money-box and puzzle generators take thickness and kerf from there (why that matters is in our guide to finger joint box design), and the modules that export LightBurn projects write power and speed into the file’s layers.
One last rule: a new batch of sheets, a new lens or freshly cleaned optics means a new grid. Five minutes of cutting is cheaper than one wasted sheet.
Frequently asked questions
What power and speed should I use to cut 1/8″ plywood?
On a 60 W CO₂ start at 60–80% power and 12–25 mm/s in one pass; on a 10 W diode at 100% and 3–5 mm/s (180–300 mm/min) in 1–2 passes. Those are ranges, not settings — find the exact pair with a power × speed grid on an offcut of your own sheet.
Can a 10 W diode laser cut 1/4″ plywood?
Usually yes, but in 3–5 passes at 2–3 mm/s, with strong air assist and a real risk of dark edges. For batches of 1/4″ a 20–40 W module or a CO₂ laser, which cuts it in a single pass, is far more practical.
One slow pass or two fast ones?
On thicker stock two faster passes often give a lighter edge, because the sheet cools between them. On thin stock one pass is faster and gives a narrower kerf. Try both on the grid — and see how to prevent laser burn marks.
Why doesn’t my laser cut through plywood in the far corner of the bed?
Most often a warped sheet (focus drifts at the edge), misaligned mirrors (less power in the corner farthest from the tube) or a void in the core right there. Raise the settings only when the same test square fails to drop out both in the center and in the corner.