 Laser MTS
In short
- Measure the thickness with calipers and enter the measured value — “1/8″” plywood runs anywhere from 2.8 to 3.2 mm, and the batch-to-batch difference is bigger than your kerf.
- Kerf takes half its width off each side of the line. Uncompensated, fingers come out narrower and notches wider — with a 0.15 mm (0.006″) kerf that’s 0.3 mm of play. A box generator, or Kerf Offset in LightBurn, moves the lines out by half a kerf.
- Finger width: never narrower than the sheet thickness; a good starting point is 2–4 × thickness (6–12 mm, about 1/4–1/2″, on 1/8″ plywood).
- Pick the lid for the job: slip-on (simplest), sliding (pencil cases, small parts), hinged (wooden pin, no hardware).
- Press-fit with full kerf compensation; glued — leave a little play. Cut order: holes and notches before the outline.
How a finger joint works
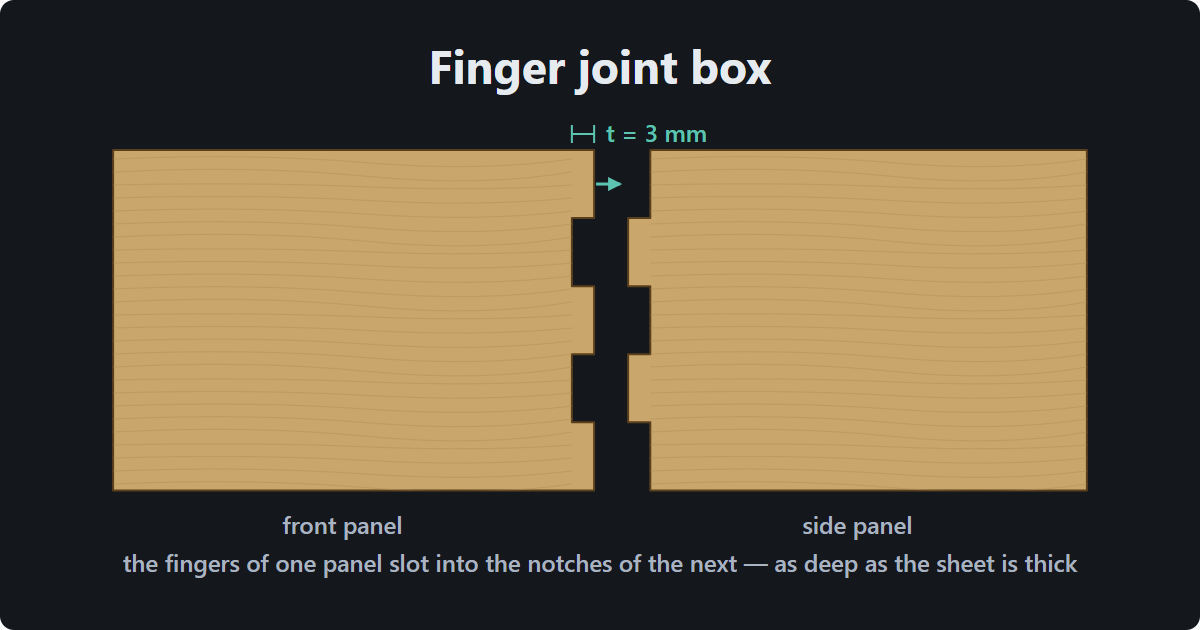
Along every panel edge, fingers and notches alternate. A finger is exactly as long as the sheet is thick, so after assembly its end sits flush with the face of the neighboring panel. Two edges meet at each corner: where one panel has a finger, the other must have a notch. The bottom joins the walls the same way — either with a comb along its edge, or with fingers dropped from above into closed slots cut into the bottom a little in from its edge (the walls then stand on the bottom rather than beside it).
All the precision of such a box lives in three numbers: sheet thickness, kerf and finger width. You measure the first two and choose the third.
Step 1: real thickness, not nominal
Finger length and the width of slots for the bottom or dividers are calculated from the thickness you enter. The European plywood standard EN 315 allows ±0.2 mm on sanded panels up to 3 mm thick and −0.2 to +0.4 mm on unsanded ones — so a “3 mm” sheet can legally measure anywhere from 2.8 to 3.4 mm (0.110–0.134″). Baltic birch sold as 1/8″ is in fact metric 3 mm stock, not 0.125″ (3.18 mm), and two batches from the same supplier can differ by 0.3 mm — more than the kerf you are about to compensate so carefully.
So measure every new batch with calipers at several spots on the sheet (corners and center) and enter the average. If one sheet varies by more than about 0.2 mm, don’t cut boxes with dividers from it. Where the differences come from is covered in best plywood for laser cutting.
Step 2: kerf and kerf compensation
A laser doesn’t cut on the line — it burns a slot of kerf width around it, usually 0.1–0.3 mm (0.004–0.012″) depending on the machine, lens and material. The center of the beam follows the line in the file, so material disappears half a kerf on each side. For a finger (a bump) that means it comes out a full kerf narrower; for a notch (a hollow), a full kerf wider.
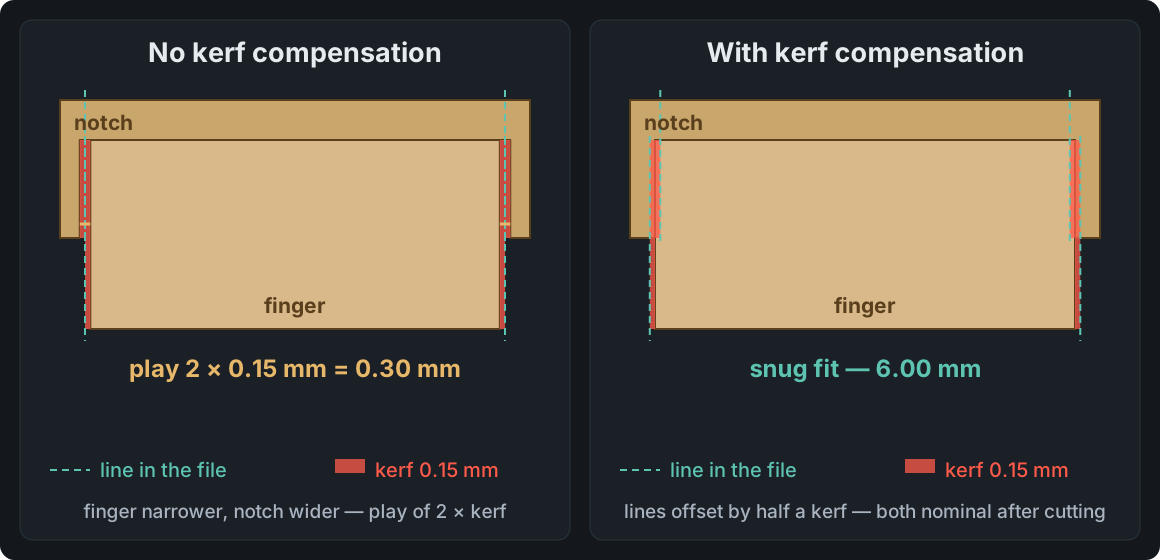
With a 0.15 mm kerf, an uncompensated finger is 0.15 mm too narrow and the notch 0.15 mm too wide — 0.3 mm (0.012″) of play in total. That’s enough for a box to rattle. Compensation means moving the lines half a kerf outward on fingers and inward on notches; after burning, both dimensions land on nominal. A box generator does this for you once you enter the kerf. In LightBurn the Kerf Offset field in the layer settings does the same job: a positive value offsets the path outward on a closed shape, a negative one inward, and the drawing itself stays unchanged — it only works on closed shapes.
Kerf takes a few minutes to measure with a strip of pieces or a comb of slots — see How to measure laser kerf for a step-by-step example. Measure it on the sheet you’ll actually cut: the same laser leaves a different kerf in poplar and in birch.
Step 3: finger width
Finger width is largely a matter of looks — it has little effect on the fit. There are limits, though:
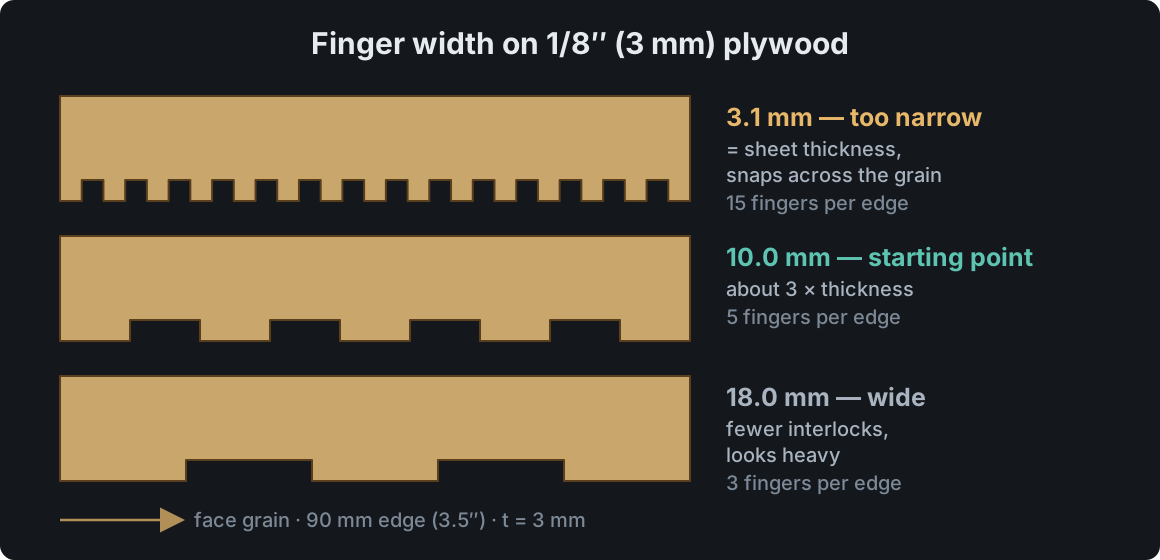
- Never narrower than the sheet thickness. A 3 mm finger in 3 mm plywood is a thin tooth that snaps across the face grain the first time you assemble it. The popular boxes.py generator defaults to fingers 2 × thickness wide; the Laser MTS box generator suggests 12 mm (about 1/2″) on 3 mm plywood — either way you are safely above the limit.
- Starting point: 2–4 × thickness, i.e. 6–12 mm on 1/8″ stock, 12–24 mm (1/2–1″) on 1/4″ (6 mm). Small boxes look better with a finer comb, large crates with a wider one.
- An odd number of segments. An edge looks symmetrical when it starts and ends with the same thing — a finger or a notch. A generator therefore adjusts the width so an odd number of segments fits along the edge; the 12 mm you typed becomes, say, 11.4 mm.
- Corners. At the bottom, three panels meet in each corner. A generator makes sure the end segment at a corner is a notch on both adjacent walls, so the slots in the bottom don’t run into each other. If you draw a box by hand, check exactly that spot.
Lids: slip-on, sliding, hinged
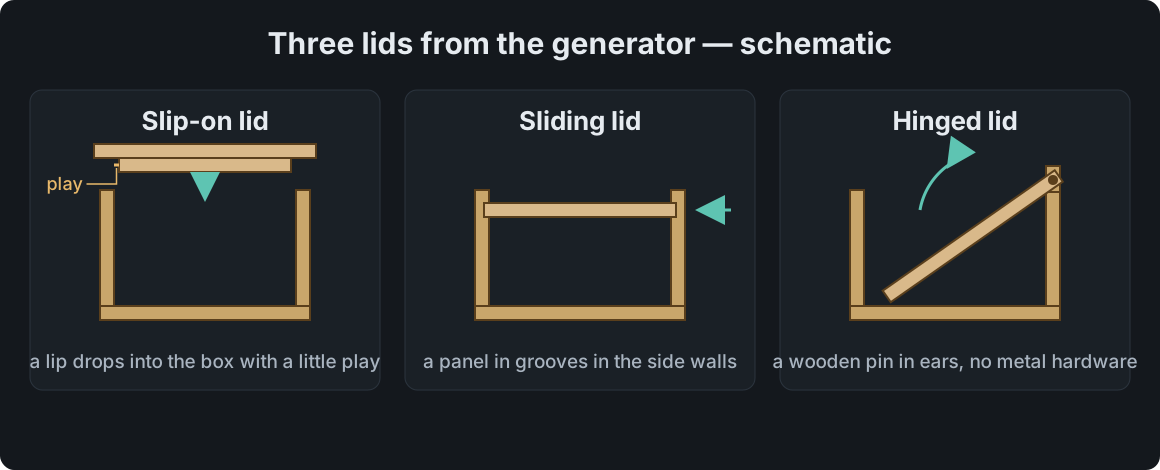
| Lid | How it works | Watch out for |
|---|---|---|
| Closed | six finger-jointed panels glued into one piece | can’t be opened — for coin banks or boxes you cut open after gluing |
| Slip-on | a panel with a lip (a second, smaller panel) that drops inside the box | lip play: about 0.4 mm (1/64″) total is a good start; at zero the lid jams when humidity changes |
| Sliding | a panel runs in grooves cut into the side walls | the groove must be wider than the sheet after kerf; a tight groove scratches the lid |
| Hinged | ears on the back wall and the lid, a wooden pin through them | cut the pin hole on a scrap first — kerf enlarges it; the pin should turn, not fall out |
The slip-on lid is the simplest and most forgiving: the lip has deliberate play and doesn’t depend on kerf the way fingers do. A sliding lid works well for pencil cases and small-parts boxes but needs a flat sheet — a warped panel locks in the groove. A pinned hinge concentrates the most precision in one spot: the hole diameter after cutting has to match the pin, so treat it like any other hole — scrap, measure, adjust.
Grain direction and looks
1/8″ plywood usually has three plies, and both outer plies run the same way. A narrow finger cut along the face grain has its fibers running lengthwise in two plies out of three; across the grain, in only one — and that’s the one that snaps. At 2 × thickness and wider, strength no longer depends on it, but looks do: four walls with the grain running the same way read as one box, not four boards. So lay the panels out in one orientation — when nesting, that means turning 90° rotation off.
Press-fit or glue
Press-fit
- full kerf compensation — finger and notch at nominal,
- assemble with a rubber mallet, not brute force,
- for boxes meant to come apart: organizers, prototypes, flat-pack kits.
Glued
- leave a little play, e.g. compensate slightly less than the full kerf — glue needs room, and zero-play fingers squeeze it out,
- wood glue (PVA) or CA glue; wipe squeeze-out right away, dried glue blocks oil and finish,
- for anything that has to last years: wood moves with humidity and a press-fit loosens over time.
The fastest way to hit the fit without math: a fit comb. It’s a row of slots as wide as the sheet thickness ± a few hundredths of a millimeter — you push a scrap of the same plywood into them and see which one fits the way you want. How to cut one is in laser material test.
Cut order and assembly
- Holes and notches first, outline last. A panel still held in the sheet can’t shift while the laser cuts divider slots in it. In LightBurn, “Cut inner shapes first” in the optimization settings takes care of this — it’s on by default, but worth checking after importing someone else’s file.
- Masking tape on the face veneer on the beam side keeps scorching off the fingers — more in prevent laser burn marks.
- Assemble from the bottom up. Walls onto the bottom first, corners last. If a finger won’t go in, don’t hammer it — check whether the notch has an uncut ply left in it.
Common mistakes and their causes
| Symptom | Most likely cause | What to do |
|---|---|---|
| Loose fingers, the box rattles | no kerf compensation, or a kerf wider than entered (focus is off) | measure the kerf, check focus, enter the measured value |
| Fingers stand proud of the wall | sheet thinner than the thickness entered | measure the batch with calipers, enter the average |
| Fingers sit below the surface, bottom doesn’t seat | sheet thicker than entered | same — at 3.2 instead of 3.0 mm the step is 0.2 mm |
| Won’t go together | too tight: full compensation plus a thicker sheet, or an uncut ply | fit comb, check the back of the sheet |
| Snapped fingers | fingers narrower than the thickness, across the grain | wider fingers, panels along the grain |
| Old file doesn’t fit the new sheet | thickness change, e.g. 1/8″ to 1/4″ — finger length and every slot change | recalculate the design for the new thickness, don’t scale it |
The last one is a classic: a file drawn for 3 mm, scaled up in your software, ends up with fingers of the wrong length, because scaling changes everything at once while only the joint depth should change. In the Laser MTS box generator you take thickness and kerf from the Material library — measured once for a given sheet and laser — pick a lid, dividers, a cutout pattern or lettering, check the assembly in a 3D preview and download SVG, DXF, PDF or a LightBurn project with layers. A finished finger-joint box file — including one from another program — can be converted to a different sheet thickness in Thickness change (Pro plan), choosing whether the inside or the outside dimensions stay the same.
Frequently asked questions
How wide should finger joints be on 1/8″ plywood?
Never narrower than the sheet thickness; 6–12 mm (1/4–1/2″) is a good starting point. Narrower fingers snap across the grain, wider ones look heavy and give fewer interlocks along the edge.
Do I need kerf compensation for finger joints?
Yes, if the box is supposed to hold without glue. Uncompensated play equals two kerfs — with 0.15 mm that’s 0.3 mm. A box generator offsets the lines by half a kerf for you; in LightBurn, Kerf Offset does it on closed shapes.
Why doesn’t a downloaded box file fit my plywood?
Most often the sheet is a different thickness than the one the file was drawn for (2.8 instead of 3.0 mm is enough), or your laser’s kerf is different. Measure both and recalculate the design.
Does a finger joint box hold without glue?
With full kerf compensation and a well-measured thickness — yes, as a press-fit. Wood moves with humidity, though, so a box meant to last years is better glued, with a little play left in the fingers.