 Laser MTS
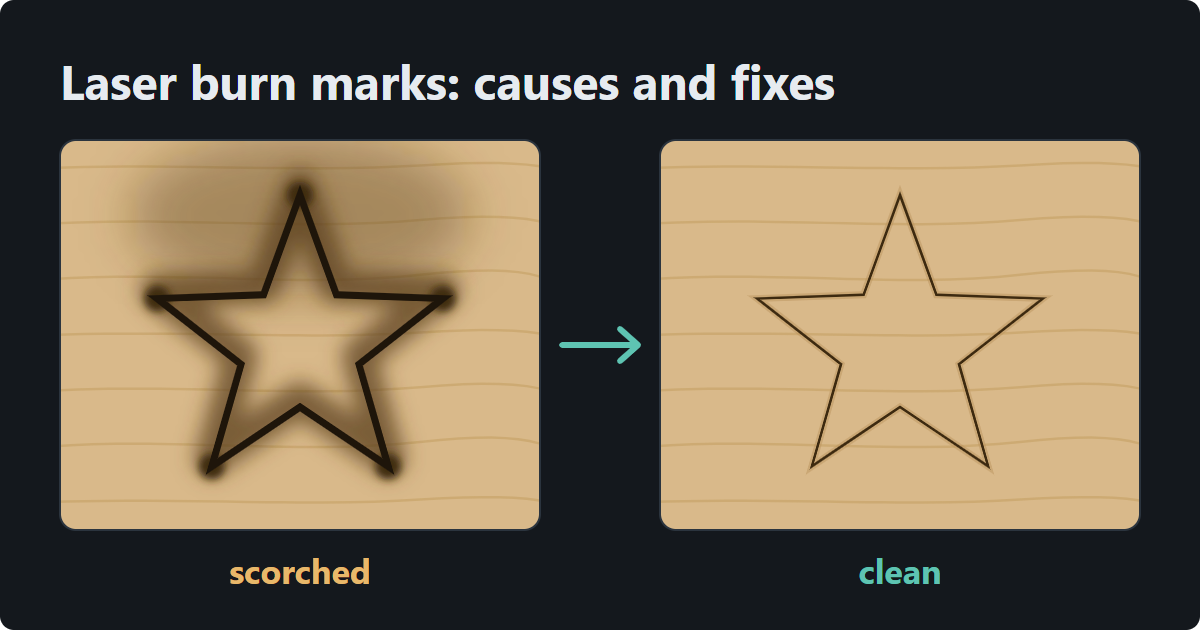
In short
- Most scorching comes from too much energy per millimeter — too slow or too much power. You want the fastest setting that still cuts through, and a test on a scrap finds it fastest.
- Strong air assist when cutting wood kills flames in the kerf and blows the smoke out. Turn it down for engraving and acrylic.
- Paper transfer tape catches smoke and resin — peel it off and the surface underneath is clean.
- Pins or a knife-blade bed instead of honeycomb get rid of flashback marks on the back.
- A brown edge on laser-cut wood is normal. What you're fighting is black residue, stains and marks on the back — not the edge color itself.
Symptom → cause → fix
A laser doesn't cut with a blade — it burns and vaporizes wood in a gap a fraction of a millimeter wide. Some heat always spreads sideways, and the smoke and resin have to land somewhere. Find the symptom you see on your part:
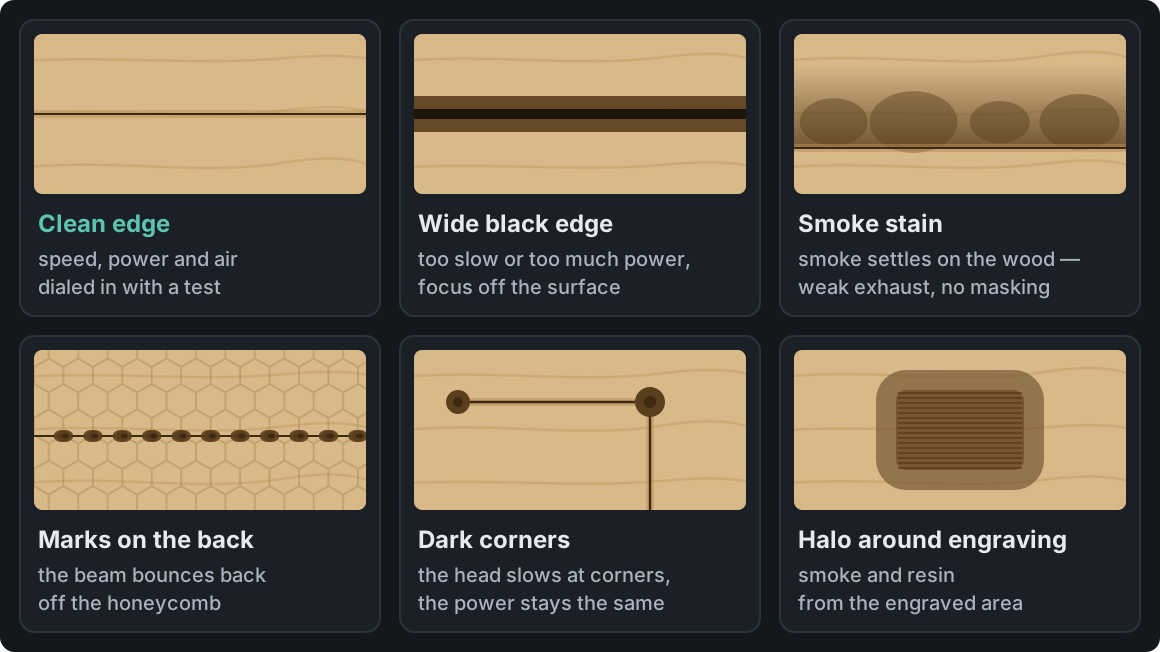
| Symptom | Most common cause | Fix |
|---|---|---|
| Wide black edge | too slow or too much power; focus off the surface | more speed or less power; check focus |
| Flames while cutting | weak air assist, too slow | stronger air assist, more speed, clean nozzle |
| Stain along the cut | smoke settling on the surface | transfer tape, better extraction |
| Marks on the back | flashback off the honeycomb, dirty bed | pins or blades, clean bed, no extra power |
| Dark corners | the head slows down, the power stays the same | min power (CO₂) or dynamic power (diode) |
| Engraving halo | smoke and resin from the engraved area | tape, engrave toward the exhaust, less air |
| Sticky residue | resin in the wood or glue in the plywood | a different sheet, clean with alcohol |
| Double burn | duplicate lines in the file | remove duplicates before cutting |
Too much energy per millimeter
How much heat reaches each millimeter of the line depends on the ratio of power to speed. An example (roughly, for a 60 W laser): 50% power at 20 mm/s puts about 1.5 J into every millimeter of the line; at 25 mm/s it's 1.2 J — 20% less heat at the edge.
So you're looking for the fastest speed that still cuts all the way through. Every “just to be safe” margin means a wider kerf, a darker edge and stronger flashback on the back. The quickest way to find that setting is a power × speed grid in cut mode on a scrap of the same sheet — see our laser material test guide. The free Laser MTS Material tests generate such a grid as a ready-made file: every field sits on its own LightBurn layer with power and speed already set, so a single run shows you which setting cuts cleanest.
Check focus too. A beam focused above or below the surface spreads its energy over a wider band — the edge comes out wide and dark and the cut shallower. How to set it: laser focus guide.
Several faster passes instead of one slow one?
Often, yes. Two faster passes usually leave a lighter edge than one slow pass, because the wood cools between passes and the air clears the smoke out of the kerf. With diode lasers it's standard practice for 4–6 mm (roughly 5/32–1/4″) plywood.
But not always. Every pass reheats the edge, the kerf gets wider, and the focus stays at the surface even though the cut is deeper — unless you lower the focus a bit between passes. A CO₂ laser on 3 mm (1/8″) plywood often cuts cleanest in a single pass at a well-chosen speed. Try both on a scrap.
Air assist and exhaust
Air assist is a jet of compressed air from the nozzle straight into the cut. It puts out flames in the kerf and blows the smoke down before it settles on the edge. There's no single right pressure — it depends on the nozzle and compressor — so turn it up gradually until the flames stop and the edge gets lighter.
| Job | Air | Why |
|---|---|---|
| Cutting plywood, MDF | strong | kills flames and clears the kerf |
| Engraving wood | lower | a strong jet spreads smoke across the surface around the engraving |
| Cutting acrylic | low | the edge comes out smooth and glossy |
Stock air pumps (aquarium-style) on budget CO₂ lasers are often too weak for clean plywood cuts — a compressor with a pressure regulator makes a visible difference. Check the nozzle too: the beam should pass through the center of the opening, and the nozzle itself mustn't be clogged.
The exhaust decides where the smoke that the air assist didn't push down ends up. Stains that always trail in one direction show you the airflow in the chamber. For engraving, work toward the exhaust: with the exhaust at the back of the machine, engrave from front to back. In LightBurn that means bottom to top of the design — which is what the default Scan Angle of 0° does (180° reverses it). The smoke then passes over the area not yet engraved — which the laser is about to burn away anyway.
Transfer tape — the simplest fix for smoke stains
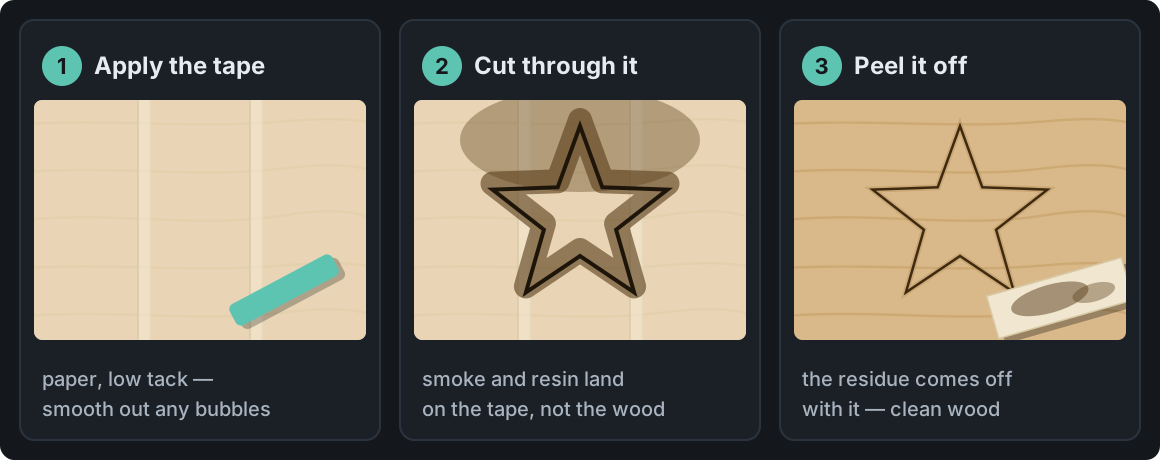
All you need is paper application tape (the kind sign makers use to transfer vinyl lettering) or wide low-tack paper masking tape. Cover the whole surface, cut or engrave through it, peel it off — the smoke and resin stay on the tape.
- Paper, not plastic. Film melts at the edge and you don't always know what it's made of — vinyl films are PVC, which you must never cut (more in Laser cutter safety).
- Low tack. Aggressive tape pulls fibers out of thin face veneer when you peel it.
- Press it down with a squeegee or a card. Any bubble under the tape is where smoke gets in anyway.
- Re-test your settings. Cutting through tape sometimes needs a little less speed or a little more power.
- With fine engraving, tape stays in the centers of “o”, “a” and “e” and has to be picked out. With large engraved areas it's sometimes faster to engrave without tape and clean up afterwards.
- Tape on the back helps when the marks show up on the underside.
Pins instead of honeycomb
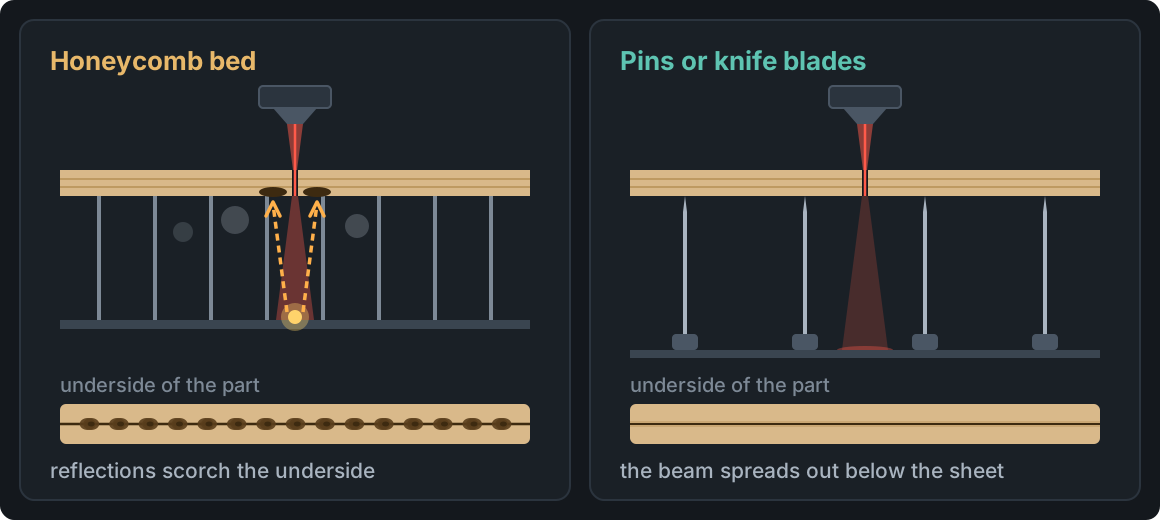
A honeycomb bed supports the sheet on hundreds of edges. After the beam passes through the sheet it hits the cell walls and the bottom of the bed, and the reflected light and heat scorch the back — hardest where the cut line crosses the walls. Smoke also gets trapped under the sheet.
- Pins (e.g. magnetic ones that sit in the honeycomb) or a knife-blade bed: the sheet touches the bed at a few points, and the beam travels far down and spreads out beyond focus.
- Place supports with care. Not under a cut line — and so every cut part has something to rest on. Small parts that drop can scorch or catch fire in the tray.
- Keep the bed clean. Burnt resin on the honeycomb leaves marks too.
- Don't cut with extra power — the more energy goes through the sheet, the stronger the flashback.
- No pins? Raise the sheet on spacers a few millimeters to about 15 mm (up to roughly 5/8″) above the honeycomb and refocus on the surface of the material.
Cut order and corners
Holes and inner details first, outer contour last. A part cut free early can drop or shift — later lines land in the wrong place, and a tilted part takes the beam on its edge and scorches. In LightBurn that's the “Cut inner shapes first” option in the optimization settings.
Corners. The head slows down at every corner, and at constant power each millimeter gets more energy — hence dark dots in corners and at the start point. On CO₂ lasers with a DSP controller (e.g. Ruida), set Min Power lower than Max Power: the lower value applies while the head slows down. On GRBL diode lasers, dynamic power mode helps (in LightBurn: “Constant Power Mode” unchecked).
Duplicate lines. Two identical outlines on top of each other mean two passes in the same place — a wider, darker kerf, often on just part of the outline. How to catch them: laser cutting file mistakes.
Parts packed too tight. Parts nested too close together scorch too — the thin strip of material between two cuts has nowhere to shed heat. How much gap to leave is covered in Nesting for laser cutting.
The material matters too
Pine and other softwoods contain resin that leaves a sticky dark residue. Plywood made with exterior (waterproof) glue usually has darker edges and cuts worse than plywood made for lasers. If a new batch scorches noticeably more than the last one with the same settings, the sheet may be to blame — more in Best plywood for laser cutting.
How to clean burn marks after the fact
| Method | Works on | Watch out |
|---|---|---|
| Sandpaper, 180–240 grit | edges, residue on wood | plywood face veneer is thin — sand lightly, with the grain |
| Rubber eraser | light smoke residue on raw wood | won't lift residue baked into the fibers |
| Melamine sponge | residue on raw wood | barely damp — water raises the grain; dulls glossy acrylic |
| Isopropyl alcohol | resin and residue on wood, glass, stone, anodized aluminum | damp cloth, not wet; test on a scrap, it dissolves some finishes; never on acrylic |
| Water with dish soap | acrylic | soft cloth; alcohol causes cracks (crazing) along laser-cut edges (why it happens: Laser cutting acrylic) |
You can't bleach a brown wood edge back to the color of raw wood. If it needs to look even, sand it lightly or finish it with oil or stain to even out the color. Cheapest of all is having nothing to clean: the right speed, strong air assist, tape and pins cover most cases.
Frequently asked questions
Why does my laser burn plywood?
Most often because of too much energy (too slow or too much power), weak air assist, smoke settling on the surface and flashback off the bed. On top of that, the glue in plywood is harder to burn through than the wood itself.
How do you remove laser burn marks from wood?
Light residue comes off with a rubber eraser or a cloth with a little isopropyl alcohol. Heavier marks need 180–240 grit sandpaper — carefully, because plywood face veneer is thin.
Is masking tape safe to use in a laser cutter?
Paper tape is — it's just paper and adhesive. Avoid self-adhesive plastic films, especially vinyl, because that's PVC.
Why are there honeycomb marks on the back of my laser-cut parts?
After passing through the sheet, the beam bounces off the cell walls and the bottom of the bed. Pins or a knife-blade bed, a clean bed, tape on the back and cutting without extra power all help.
How do I cut plywood with a diode laser without burning it?
Air assist is a must, plus several faster passes instead of one slow one, tape on the surface and accurate focus. Dial in power and speed with a test on a scrap.